 \n \n
\n \n  \n\n### El registro del otro\n\nPara la primera dinámica se nos envió un documento con el registro de todos los\nparticipantes (más de 40 personas) y nos pidieron que hagamos un registro de 10 de ellas.\n\nPara esta consigna decidí aplicar algoritmos computacionales similares a los\nutilizados por las redes sociales para comprender el contenido que publicamos\ncotidianamente en ellas y así ayudar a identificar la disonancia entre nuestra\nfantasía respecto a lo que realmente las máquinas logran captar.\n\n### La elección de los registros\n\nLa primera decisión que tomé fue que yo no iba a elegir las personas a registrar sino que lo iba\na hacer la computadora. Para esto creé un archivo plano `usuarios.txt` con una cuenta de instagram por línea\ny corrí el siguiente comando en la terminal para que se genere un nuevo archivo con 10 cuentas al azar:\n\n`$ cat usuarios.txt | sort -R | head -n10 > elegidos.txt`\n\nUna vez obtenidos los 10 elegidos (y sin mirar el resultado para no hacer trampa) pasé a la primera técnica\npara hacer mis registros asistidos por computadora.\n\n### Técnica 1\n\n> Sin que yo pueda verlo, un algoritmo descarga una imagen de una cuenta de instagram,\n la observa y genera una descripción corta de la misma.\n\n> Luego de recolectar las frases, sin haberlas yo visto y sin saber de quienes son\n hago un dibujo de cada descripción. Finalmente presento la descripción automática\n junto al dibujo y la imagen original.\n\n#### El día que tu AI lo entienda...\n\nEl primer paso fue entonces seleccionar una imagen al azar de cada una de las cuentas de Instagram\nde estas personas. Para esto usé [InstaLoader](https://instaloader.github.io/) que nos permite\ndescargar media y metadata de cuentas de instagram desde un CLI. A partir de esta herramienta generé el siguiente\nscript:\n\n```bash\nITER=0\nfor INSTAGRAM in $(cat elegidos.txt)\ndo\nITER=$(expr $ITER + 1)\necho \"Starting ${ITER}\"\nPROFILE_DIR=\"instagram/${INSTAGRAM}\"\ninstaloader ${INSTAGRAM} --dirname-pattern=\"${PROFILE_DIR}\" --post-filter=\"date_utc >= datetime(2019, 4, 30)\" --no-captions --no-videos > /dev/null\ndone\n```\n\nEl script de bash itera sobre la lista de elegidos y ejecuta `instaloader` por cada uno de ellos trayendo fotos del último año.\nDecidí esto para no traer un registro demasiado antiguo y porque mucha gente tiene una actividad agitada en la red.\nLas imagenes de cada usuario van a parar a la carpeta `instagram/elusuario`. Una vez que descargué todo esto me avoqué a la tarea que más intriga me daba, la de extraer descripciónes de las imágenes.\n\nDespués de probar muchos proyectos, pelearme con pytorch, tensorflow y otros, me decidí por usar [IM2TXT](https://github.com/jmrf/im2txt-demo)\nque es una implementación del modelo propuesto en el paper [Show and Tell: Lessons learned from the 2015 MSCOCO Image Captioning Challenge](http://arxiv.org/abs/1609.06647).\n\nLuego de instalar dependencias y el modelo pre-entrenado, armé un script que:\n\n- Por cada usuario de la lista de `elegidos`:\n - Elige una imagen al azar de la carpeta de imágenes descargadas.\n - Copia la imagen original a otra carpeta para poder más tarde producir la entrega (sin verla en el momento)\n - Corre el modelo de captioning (descripción) de la imagen elegida.\n - Escupe la descripción en un archivo de descripciones.\n\nEl script me quedó así:\n\n```bash\nCHECKPOINT_PATH=\"model/train\"\nVOCAB_FILE=\"data/mscoco/word_counts.txt\"\n\nmkdir pics\n\nITER=0\nfor INSTAGRAM in $(cat elegidos.txt)\ndo\n\nITER=$(expr $ITER + 1)\n\necho \"Starting ${ITER}\"\n\nPROFILE_DIR=\"instagram/${INSTAGRAM}\"\n\nIMAGE=$(ls -1 $PROFILE_DIR | sort -R | head -n1)\n\ncp \"${PROFILE_DIR}/${IMAGE}\" \"pics/${ITER}\"\n\ncd im2txt\nbazel build -c opt //im2txt:run_inference > /dev/null\ncd ..\n\n\necho \"${ITER}\\n\" >> descripciones.txt\nbazel-bin/im2txt/run_inference \\\n --checkpoint_path=${CHECKPOINT_PATH} \\\n --vocab_file=${VOCAB_FILE} \\\n --input_files=\"${PROFILE_DIR}/${IMAGE}\" \\\n | head -n2 | grep \"0)\" >> descripciones.txt \n\ndone\n```\n\n#### A dibujar\n\nAbriendo el archivo `descripciones.txt` leí las 3 descripciones que infirió el modelo sobre las imágenes que vio\nhice un dibujo (con mi técnica super pulida) imaginando las situaciones a través del texto.\n\nEl resultado para las 3 personas que fueron pasadas por esta técnica son las siguientes:\n\n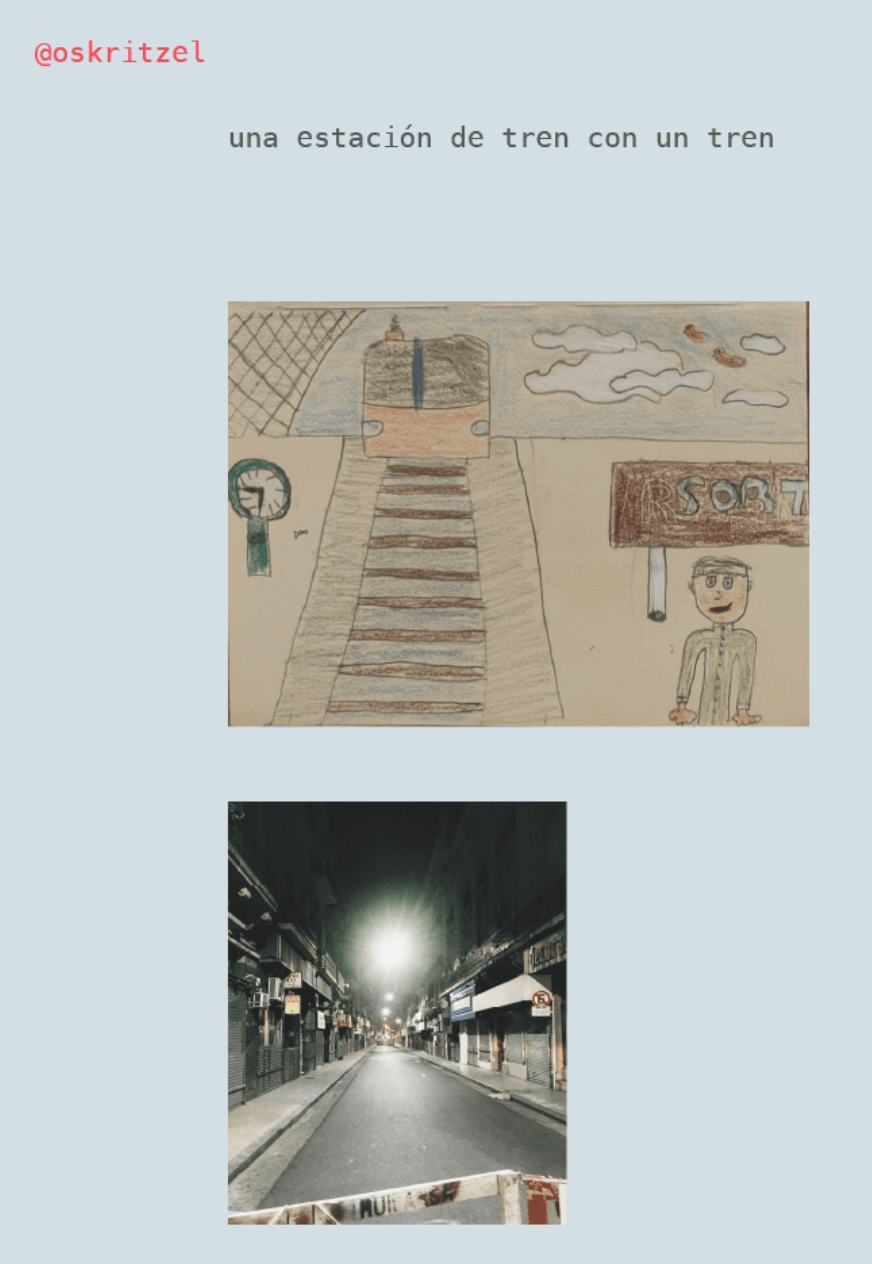\n\n\n\n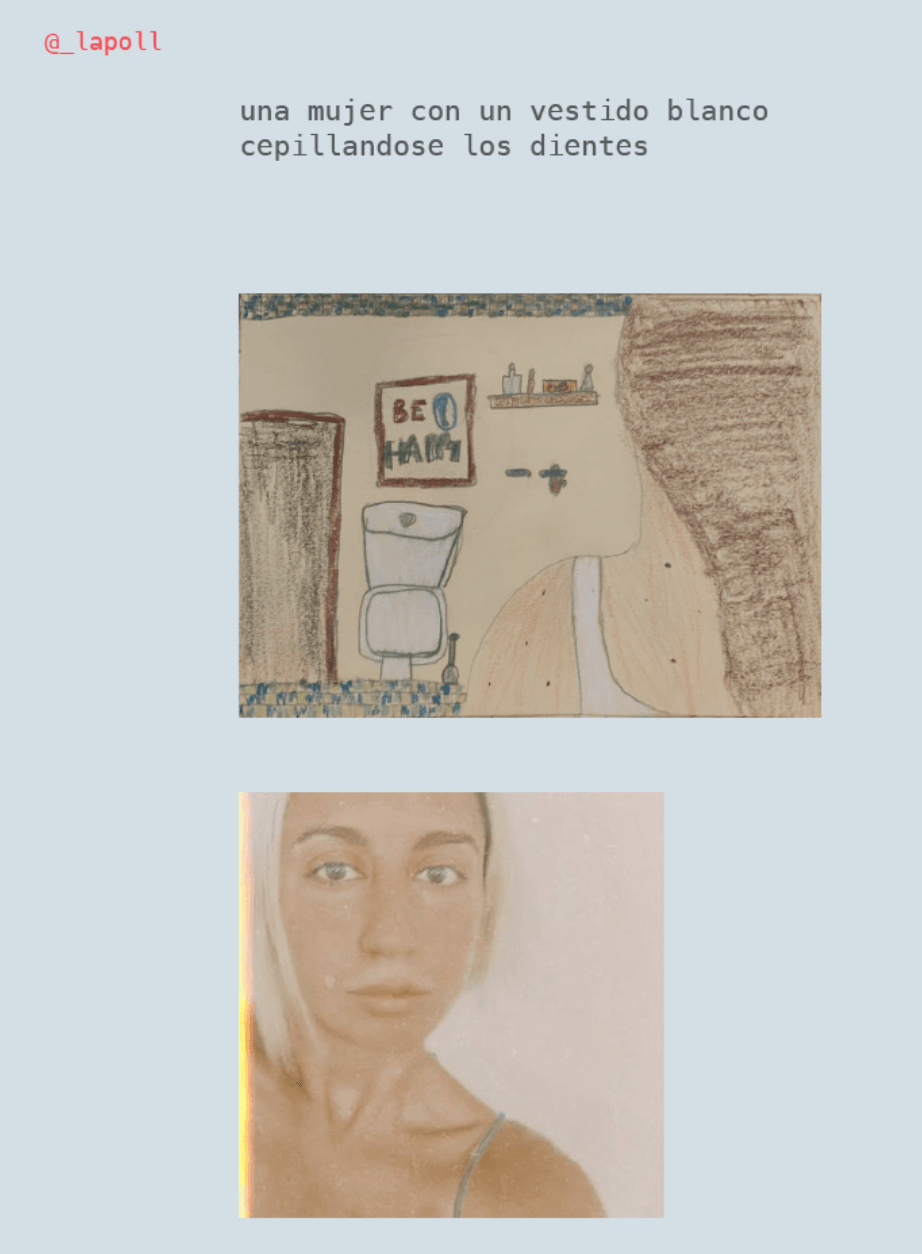\n\n\n### Técnica 2\n\n> Elijo manualmente 9 imágenes consecutivas de una cuenta de instagram y genero una descripción corta.\n Luego paso las mismas imágenes\n por un algoritmo que retorna descripciones automáticas de estas.\n \n> Presento en cada retrato las 9 imágenes junto a las descripciones manuales y\n automáticas.\n\nPara esta segunda técnica usé un script muy similar al de la técnica anterior:\n\n- Elijo las siguientes 3 cuentas de instagram de los `elegidos` y por cada una:\n - Selecciono 9 imágenes al azar.\n - Las paso por el modelo de captioning automático.\n\n\nPor otro lado, entré a la carpeta de imágenes seleccionadas por el script y escribí yo descripciones\npara esas imágenes.\n\nLo interesante de esta técnica es primero ver como el algoritmo tiene su propio bias y encuentra\ncosas muy distintas a las que nosotros vemos. En conversaciones posteriores me comentó mucha gente\ncomo se quedaban buscando elementos de la descripción del algoritmo en las imágenes.\n\nEl resultado para les 3 afortunades fue el siguiente:\n\n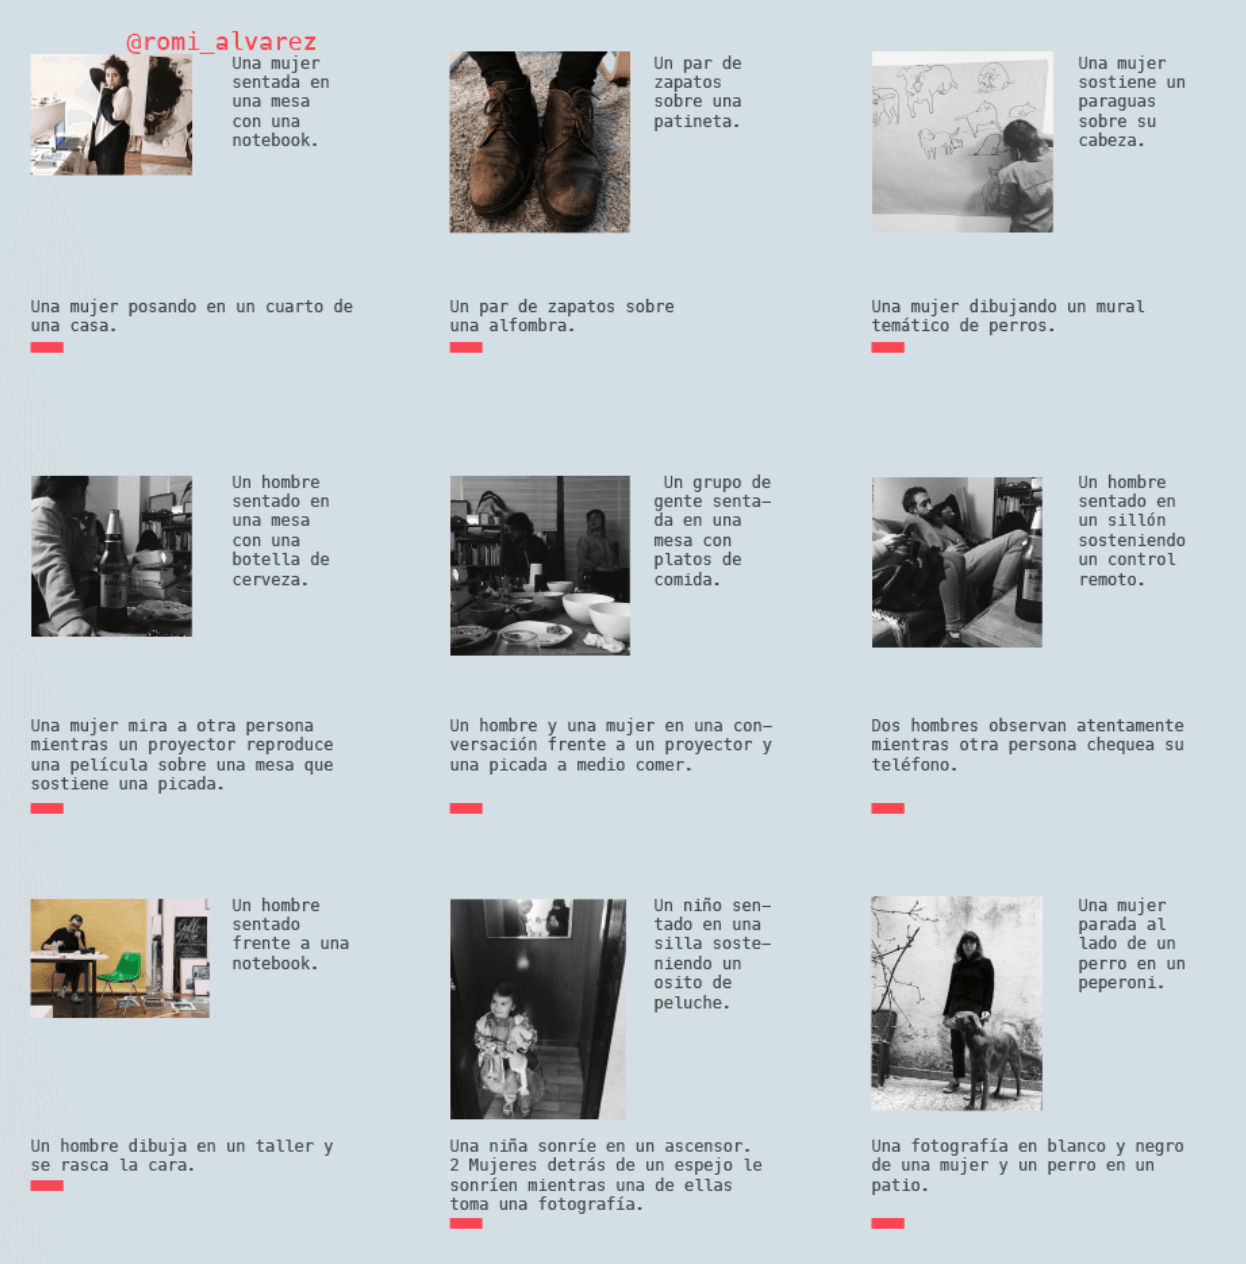\n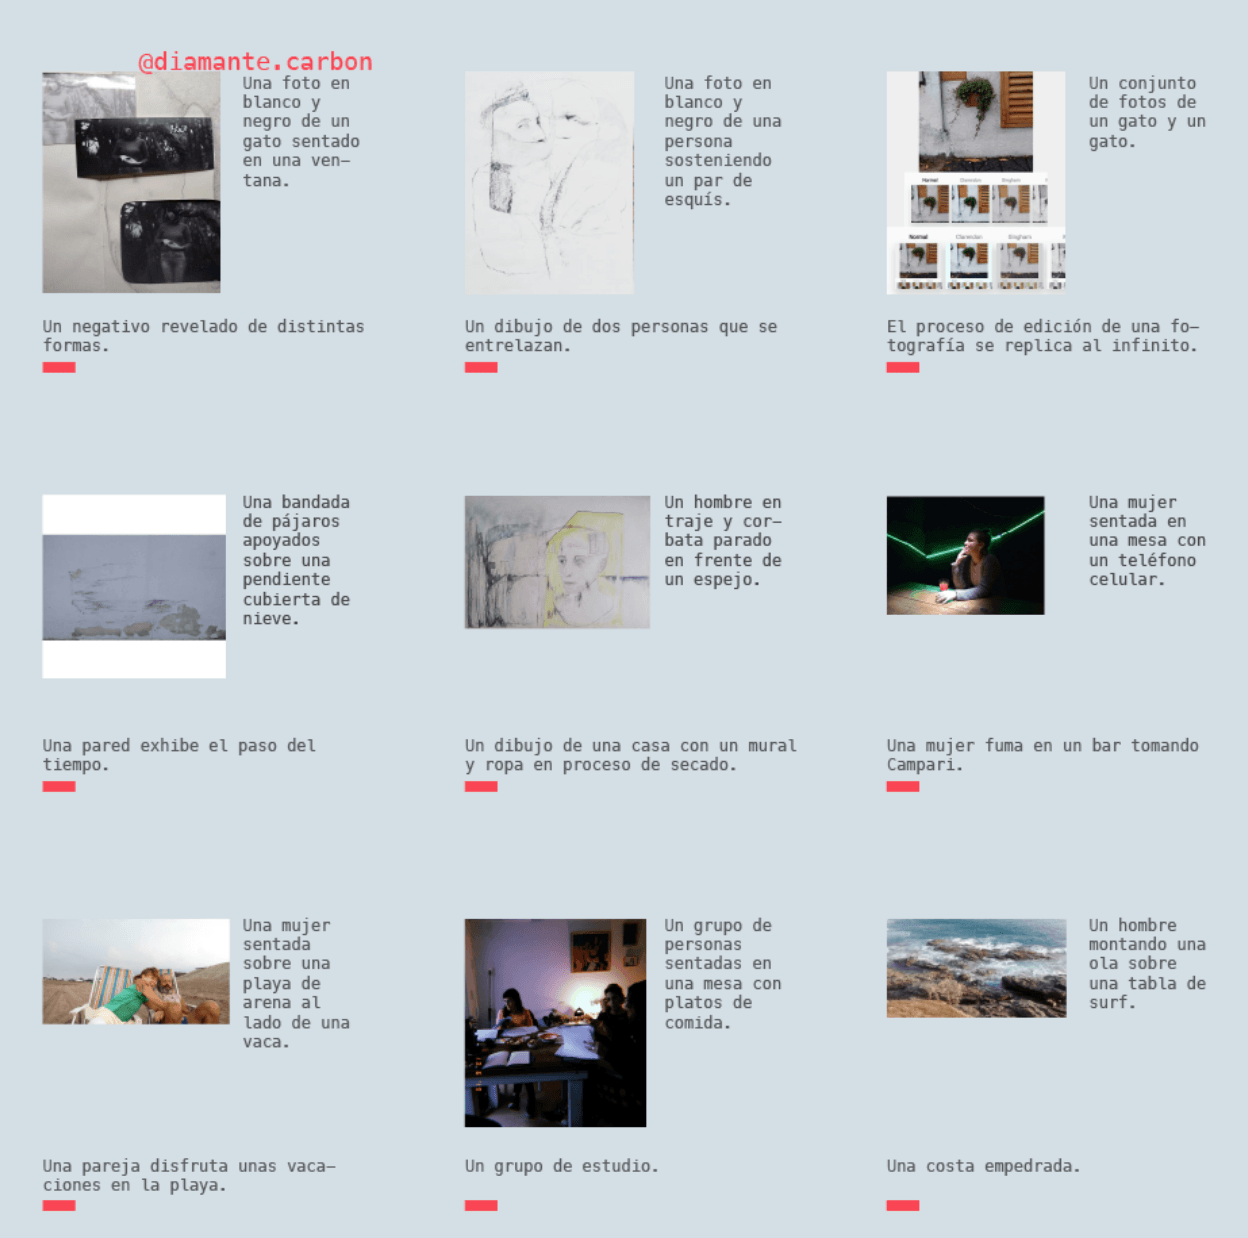\n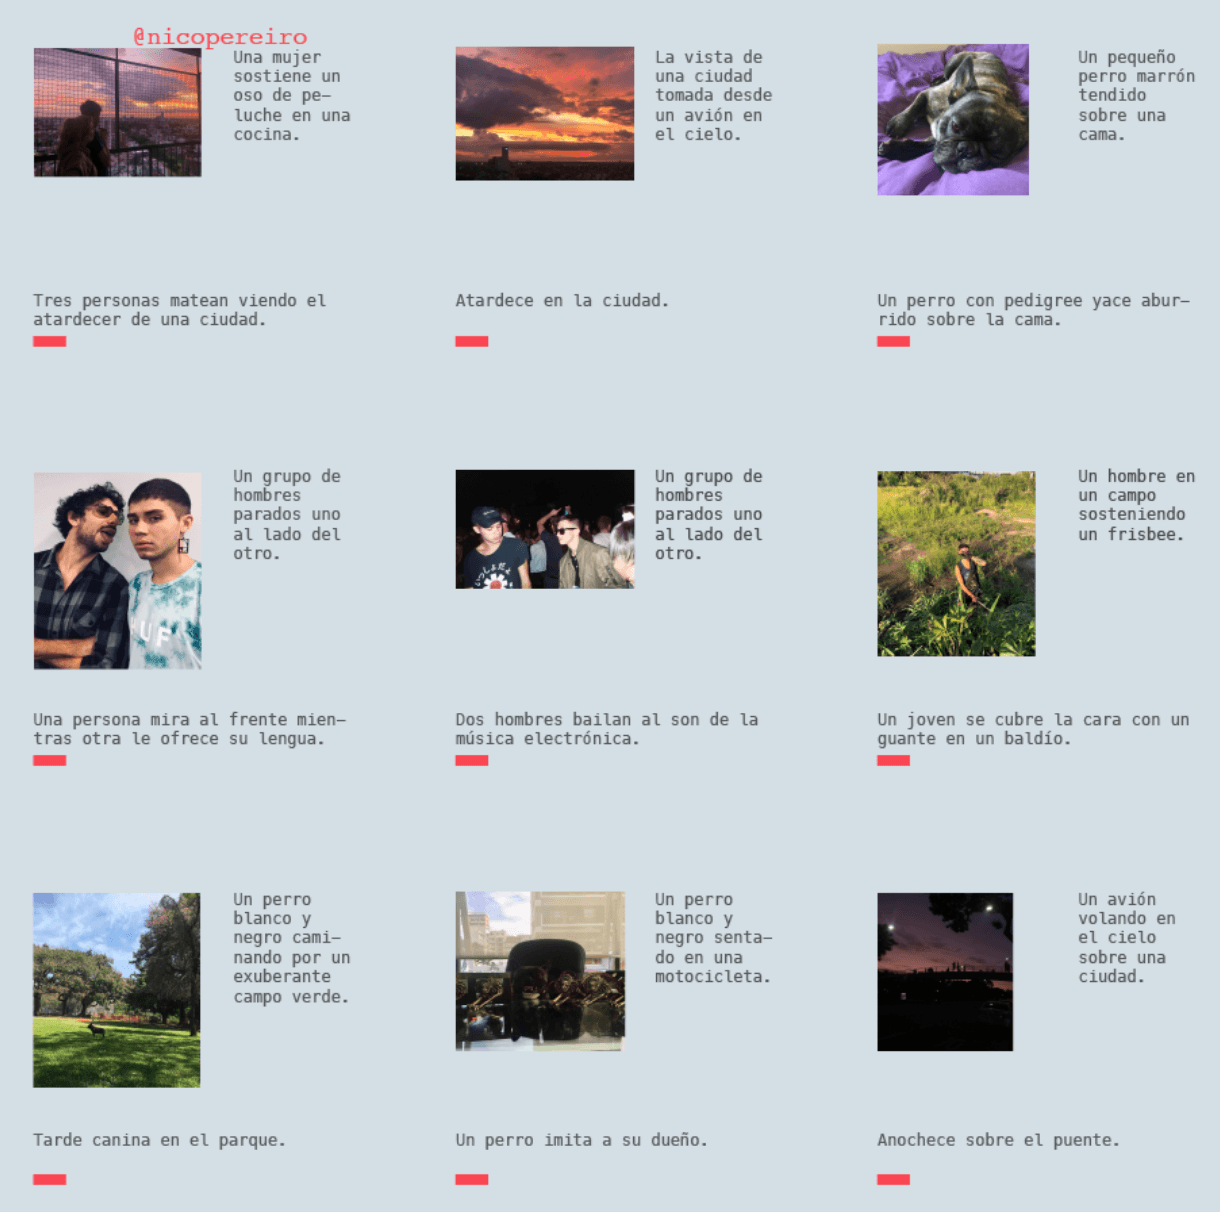\n\n### Técnica 3\n\n> Elijo una imagen al azar de una cuenta de instagram y obtengo descripciones cortas automáticas de cada una de ellas a través de un algoritmo.\n\n> Luego paso otro algoritmo que dada una frase corta genera un texto ampliado.\n\n> En cada caso presento la imagen original, la descripción autogenerada y el texto ampliado.\n\n#### Tengo miedo nene!\n\nComo podemos imaginar, las primeras etapas de esta técnica son similares a las anteriores. Con un script elijo imágenes\nde cuentas de Instagram y las paso por el algoritmo de descripción automática.\n\nLa variante en este caso es que, como en este caso no importaba que yo accediera a pasos intermedios, pude usar un servicio online\nsimple y poderoso para producir el texto largo a partir de la descripción. Para eso me apoyé en [Talk to Transformer](https://talktotransformer.com/)\nque usa el modelo `GPT-2` para completar textos a partir de un comienzo. Entonces agarré los textos generados por `im2txt`\ny los pasé por este sitio y los resultados, como pueden ver a continuación son super interesantes:\n\n\n\n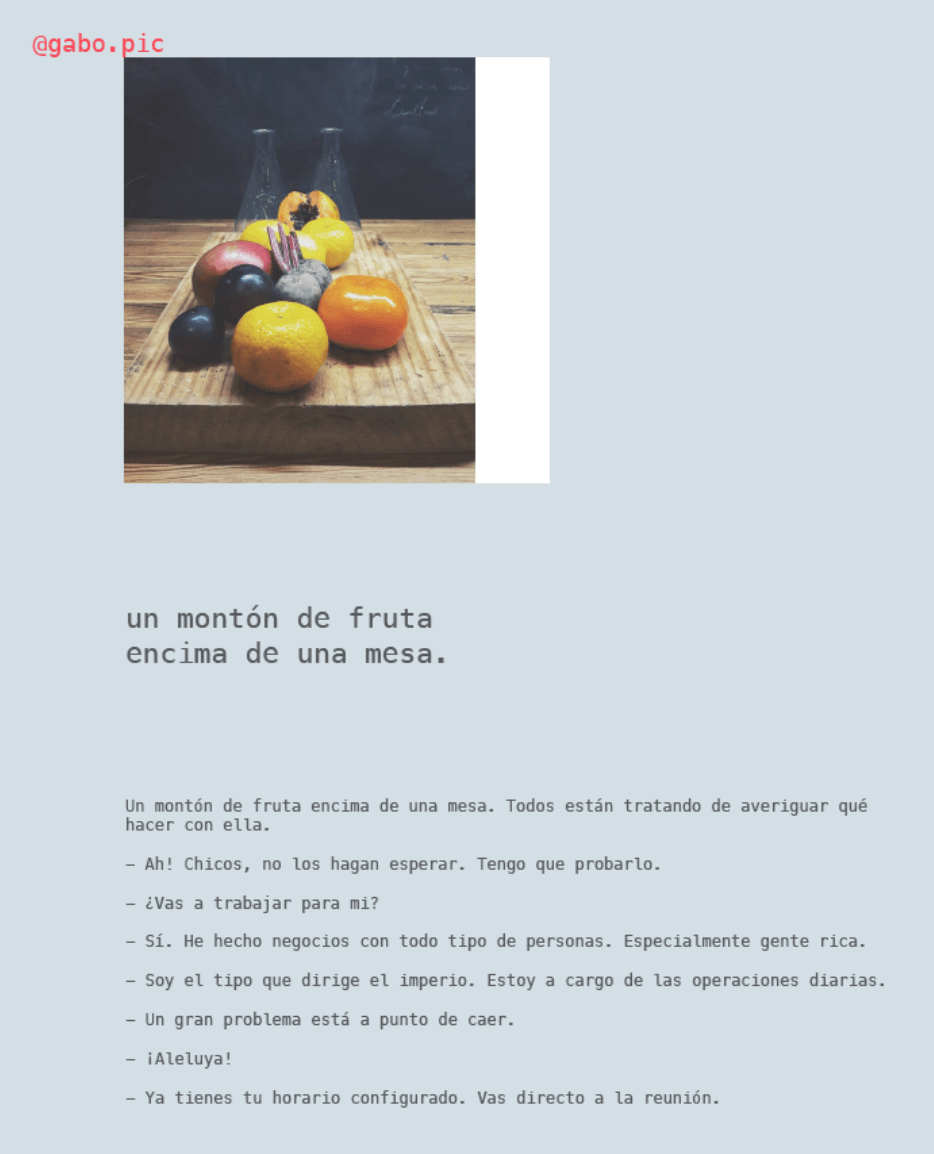\n\n\n### No tan rápido\n\nEsta fue simplemente la primera entrega de esta serie de ejercicios que estamos haciendo en la\n[Escuela Relacional](https://instagram.com/escuela.relacional) ❤️. Mis agradecimientos a\nla gente hermosa que la compone y me permite ser parte de esto.",
"date_published": "2020-06-02T21:23:35.000Z",
"date_modified": "2020-06-02T21:23:35.000Z",
"language": "es",
"tags": [
"relaciodan",
"tensorflow"
],
"authors": [
{
"name": "Dan Zajdband",
"url": "https://zajdband.com"
}
]
},
{
"id": "https://zajdband.com/nowhere-to-ssh-my-journey-into-the-serverless-world/",
"url": "https://zajdband.com/nowhere-to-ssh-my-journey-into-the-serverless-world/",
"title": "Nowhere to SSH: my journey into the Serverless world",
"summary": "I migrated a small real-world app from Express + MongoDB to Now + Firebase. I'm happy I was able to do it in ~10 hours and I don’t need to maintain or spend money on servers (at least for now).",
"content_text": "
\n\n### El registro del otro\n\nPara la primera dinámica se nos envió un documento con el registro de todos los\nparticipantes (más de 40 personas) y nos pidieron que hagamos un registro de 10 de ellas.\n\nPara esta consigna decidí aplicar algoritmos computacionales similares a los\nutilizados por las redes sociales para comprender el contenido que publicamos\ncotidianamente en ellas y así ayudar a identificar la disonancia entre nuestra\nfantasía respecto a lo que realmente las máquinas logran captar.\n\n### La elección de los registros\n\nLa primera decisión que tomé fue que yo no iba a elegir las personas a registrar sino que lo iba\na hacer la computadora. Para esto creé un archivo plano `usuarios.txt` con una cuenta de instagram por línea\ny corrí el siguiente comando en la terminal para que se genere un nuevo archivo con 10 cuentas al azar:\n\n`$ cat usuarios.txt | sort -R | head -n10 > elegidos.txt`\n\nUna vez obtenidos los 10 elegidos (y sin mirar el resultado para no hacer trampa) pasé a la primera técnica\npara hacer mis registros asistidos por computadora.\n\n### Técnica 1\n\n> Sin que yo pueda verlo, un algoritmo descarga una imagen de una cuenta de instagram,\n la observa y genera una descripción corta de la misma.\n\n> Luego de recolectar las frases, sin haberlas yo visto y sin saber de quienes son\n hago un dibujo de cada descripción. Finalmente presento la descripción automática\n junto al dibujo y la imagen original.\n\n#### El día que tu AI lo entienda...\n\nEl primer paso fue entonces seleccionar una imagen al azar de cada una de las cuentas de Instagram\nde estas personas. Para esto usé [InstaLoader](https://instaloader.github.io/) que nos permite\ndescargar media y metadata de cuentas de instagram desde un CLI. A partir de esta herramienta generé el siguiente\nscript:\n\n```bash\nITER=0\nfor INSTAGRAM in $(cat elegidos.txt)\ndo\nITER=$(expr $ITER + 1)\necho \"Starting ${ITER}\"\nPROFILE_DIR=\"instagram/${INSTAGRAM}\"\ninstaloader ${INSTAGRAM} --dirname-pattern=\"${PROFILE_DIR}\" --post-filter=\"date_utc >= datetime(2019, 4, 30)\" --no-captions --no-videos > /dev/null\ndone\n```\n\nEl script de bash itera sobre la lista de elegidos y ejecuta `instaloader` por cada uno de ellos trayendo fotos del último año.\nDecidí esto para no traer un registro demasiado antiguo y porque mucha gente tiene una actividad agitada en la red.\nLas imagenes de cada usuario van a parar a la carpeta `instagram/elusuario`. Una vez que descargué todo esto me avoqué a la tarea que más intriga me daba, la de extraer descripciónes de las imágenes.\n\nDespués de probar muchos proyectos, pelearme con pytorch, tensorflow y otros, me decidí por usar [IM2TXT](https://github.com/jmrf/im2txt-demo)\nque es una implementación del modelo propuesto en el paper [Show and Tell: Lessons learned from the 2015 MSCOCO Image Captioning Challenge](http://arxiv.org/abs/1609.06647).\n\nLuego de instalar dependencias y el modelo pre-entrenado, armé un script que:\n\n- Por cada usuario de la lista de `elegidos`:\n - Elige una imagen al azar de la carpeta de imágenes descargadas.\n - Copia la imagen original a otra carpeta para poder más tarde producir la entrega (sin verla en el momento)\n - Corre el modelo de captioning (descripción) de la imagen elegida.\n - Escupe la descripción en un archivo de descripciones.\n\nEl script me quedó así:\n\n```bash\nCHECKPOINT_PATH=\"model/train\"\nVOCAB_FILE=\"data/mscoco/word_counts.txt\"\n\nmkdir pics\n\nITER=0\nfor INSTAGRAM in $(cat elegidos.txt)\ndo\n\nITER=$(expr $ITER + 1)\n\necho \"Starting ${ITER}\"\n\nPROFILE_DIR=\"instagram/${INSTAGRAM}\"\n\nIMAGE=$(ls -1 $PROFILE_DIR | sort -R | head -n1)\n\ncp \"${PROFILE_DIR}/${IMAGE}\" \"pics/${ITER}\"\n\ncd im2txt\nbazel build -c opt //im2txt:run_inference > /dev/null\ncd ..\n\n\necho \"${ITER}\\n\" >> descripciones.txt\nbazel-bin/im2txt/run_inference \\\n --checkpoint_path=${CHECKPOINT_PATH} \\\n --vocab_file=${VOCAB_FILE} \\\n --input_files=\"${PROFILE_DIR}/${IMAGE}\" \\\n | head -n2 | grep \"0)\" >> descripciones.txt \n\ndone\n```\n\n#### A dibujar\n\nAbriendo el archivo `descripciones.txt` leí las 3 descripciones que infirió el modelo sobre las imágenes que vio\nhice un dibujo (con mi técnica super pulida) imaginando las situaciones a través del texto.\n\nEl resultado para las 3 personas que fueron pasadas por esta técnica son las siguientes:\n\n\n\n\n\n\n\n\n### Técnica 2\n\n> Elijo manualmente 9 imágenes consecutivas de una cuenta de instagram y genero una descripción corta.\n Luego paso las mismas imágenes\n por un algoritmo que retorna descripciones automáticas de estas.\n \n> Presento en cada retrato las 9 imágenes junto a las descripciones manuales y\n automáticas.\n\nPara esta segunda técnica usé un script muy similar al de la técnica anterior:\n\n- Elijo las siguientes 3 cuentas de instagram de los `elegidos` y por cada una:\n - Selecciono 9 imágenes al azar.\n - Las paso por el modelo de captioning automático.\n\n\nPor otro lado, entré a la carpeta de imágenes seleccionadas por el script y escribí yo descripciones\npara esas imágenes.\n\nLo interesante de esta técnica es primero ver como el algoritmo tiene su propio bias y encuentra\ncosas muy distintas a las que nosotros vemos. En conversaciones posteriores me comentó mucha gente\ncomo se quedaban buscando elementos de la descripción del algoritmo en las imágenes.\n\nEl resultado para les 3 afortunades fue el siguiente:\n\n\n\n\n\n### Técnica 3\n\n> Elijo una imagen al azar de una cuenta de instagram y obtengo descripciones cortas automáticas de cada una de ellas a través de un algoritmo.\n\n> Luego paso otro algoritmo que dada una frase corta genera un texto ampliado.\n\n> En cada caso presento la imagen original, la descripción autogenerada y el texto ampliado.\n\n#### Tengo miedo nene!\n\nComo podemos imaginar, las primeras etapas de esta técnica son similares a las anteriores. Con un script elijo imágenes\nde cuentas de Instagram y las paso por el algoritmo de descripción automática.\n\nLa variante en este caso es que, como en este caso no importaba que yo accediera a pasos intermedios, pude usar un servicio online\nsimple y poderoso para producir el texto largo a partir de la descripción. Para eso me apoyé en [Talk to Transformer](https://talktotransformer.com/)\nque usa el modelo `GPT-2` para completar textos a partir de un comienzo. Entonces agarré los textos generados por `im2txt`\ny los pasé por este sitio y los resultados, como pueden ver a continuación son super interesantes:\n\n\n\n\n\n\n### No tan rápido\n\nEsta fue simplemente la primera entrega de esta serie de ejercicios que estamos haciendo en la\n[Escuela Relacional](https://instagram.com/escuela.relacional) ❤️. Mis agradecimientos a\nla gente hermosa que la compone y me permite ser parte de esto.",
"date_published": "2020-06-02T21:23:35.000Z",
"date_modified": "2020-06-02T21:23:35.000Z",
"language": "es",
"tags": [
"relaciodan",
"tensorflow"
],
"authors": [
{
"name": "Dan Zajdband",
"url": "https://zajdband.com"
}
]
},
{
"id": "https://zajdband.com/nowhere-to-ssh-my-journey-into-the-serverless-world/",
"url": "https://zajdband.com/nowhere-to-ssh-my-journey-into-the-serverless-world/",
"title": "Nowhere to SSH: my journey into the Serverless world",
"summary": "I migrated a small real-world app from Express + MongoDB to Now + Firebase. I'm happy I was able to do it in ~10 hours and I don’t need to maintain or spend money on servers (at least for now).",
"content_text": "\n\n\nSince [I’m](https://x.com/jdbothma/status/1100714277185433602) [terrible](https://x.com/erik_mh/status/1181399247763202048) [at](https://x.com/fcaivano/status/849084831959052288) [](https://x.com/erik_mh/status/1181399247763202048)[managing](https://x.com/lu_cyP/status/922346987487449088) my personal project’s servers I wanted to believe the hype around Serverless architectures. My intention was to go to a scenario where I don’t have to worry about scalability, OS vulnerabilities, web servers, SSL certificates or database backups. Time will tell but for now it seems that’s the case.\n\n## The state where I was in\n\nTo start experimenting with this technology I chose [GuriVR](https://gurivr.com). It was a Preact app with a tiny Express backend using MongoDB as the primary database, you can explore the old [codebase](https://github.com/OpenNewsLabs/guri-vr/tree/3f293ea45b421169e6a8559e3d5df49dcab829d4). It was hosted on a $10/month DigitalOcean droplet along with other apps and sites.\n\n## Changing the mindset\n\nI looked at different platforms and frameworks and decided to give a chance to [Now](https://zeit.co) from Zeit, the magic **now** command played an important part in the decision.\n\nWhat I understood from the docs is that in the serverless world you get a kind of clean slate on every request. The goal is to return as fast as possible and avoid persistent connection. Firebase was a great fit for my need because it offers two products I needed to implement: Stateless authentication instead of the MongoDB backed user sessions in the old system and the **Firestore** database. One functionality I wasn’t giving up easily that I got for free in Firebase was the “passwordless” authentication.\n\nBesides the database and authentication provider change I haven’t had to change too much. The Frontend compiles to a static app that **Now** delivers super fast with their Smart CDN. The **Express** app was easy to convert. I just moved each endpoint to a separate file, matching the API structure. For the frontend I used @now/static and for the backend @now/node.\n\nMost of the ~10 hours I had to work on the migration where spent implementing the new firebase authentication and updating the database calls to use Firestore. I also moved the file uploads from AWS S3 to the Firestore Storage service just because I thought it was better to have all the services in the same provider and dashboard ¯\\_(ツ)_/¯.\n\n## Platform specific configuration\n\nBesides moving the backend endpoints to different files exporting the lambda functions I had to create a now.json file to hep **Now** figure out how my project should be deployed. This was the first time I did this and I’m sure there are better ways to do it but this is what I got:\n\n\n tl;dr: I migrated a small real-world app from Express + MongoDB to Now + Firebase. I’m happy I was able to do it in ~10 hours and I don’t need to maintain or spend money on servers (at least for now).\n
\n
{\n \"version\": 2,\n \"name\": \"gurivr\",\n \"builds\": [\n { \"src\": \"api/**\", \"use\": \"@now/node\" },\n { \"src\": \"client/dist/**\", \"use\": \"@now/static\" }\n ],\n \"routes\": [\n { \"src\": \"/api/preview\", \"dest\": \"api/preview.js\" },\n { \"src\": \"/api/stories\", \"dest\": \"api/stories.js\" },\n { \"src\": \"/api/stories/([^/]+)\", \"dest\": \"api/story.js?id=$1\" },\n { \"src\": \"/api/assets/search\", \"dest\": \"api/assets/search.js\", \"headers\": { \"Access-Control-Allow-Origin\": \"*\" } },\n { \"src\": \"/(login|guide|stories)\", \"dest\": \"/client/dist/index.html\" },\n { \"src\": \"/stories/create\", \"dest\": \"/client/dist/index.html\" },\n { \"src\": \"/(.*)\", \"dest\": \"/client/dist/$1\" }\n ],\n \"env\": {\n \"FIREBASE_ADMIN\": \"@firebase-admin\",\n \"FLICKR_SECRET_KEY\": \"@flickr-secret-key\",\n \"GMAPS_SECRET_KEY\": \"@gmaps-secret-key\",\n \"FREESOUND_SECRET_KEY\": \"@freesound-secret-key\",\n \"STORAGE_BUCKET\": \"@storage-bucket\"\n }\n} ](/wp-content/uploads/2017/01/trust_screenshot.png)\n\n\n\n[Trust](https://coralproject.net/products/trust.html) is a tool that allows a better understanding of commenters behavior in your site by applying filters, creating dynamic user lists. The main idea is that by generating the user lists, filtering by customizable variables, you can detect behavior and engagement patterns. Once identified the user groups we can take actions like sending an E-mail to a user with a gift once it's comments are good enough for our criteria.\n\nThe development of Trust was already going on when I started my fellowship and I participated mostly in the development on the tool [Front End](https://github.com/coralproject/cay/graphs/contributors). We use React and Redux for all the Coral Project Front End projects and Go, node.js & MongoDB for the Back End.\n\n### Ask\n\n[
 ](/wp-content/uploads/2017/01/asking.gif)\n\nThe first project I was involved from the beginning was [Ask](https://coralproject.net/products/ask.html). As it's name says, the idea behind this product is to allow journalists ask their audience questions, manage the submissions and embed answer galleries to display in their website.\n\nBecause The Coral is a very ambitious project we can't waste time. Since we knew we will need to embed widgets in 3rd party sites for Ask and subsequent projects, just one week after starting my fellowship I started investigating good practices and new ideas around creating embeddable widgets and ended up with [a blogpost](/exploring-new-techniques-building-composable-widgets-for-the-web/), a ton of ideas thanks to [Ted Han](https://x.com/knowtheory) insights and my first steps with [Preact](http://preactjs.com), a framework that gave me a lot of satisfaction during the year (yep, a front end framework can give you satisfactions) and that I then used in Ask and personal projects. That's also how I met [Jason](https://x.com/_developit) who became a great inspiration on how to maintain an open project.\n\nSince I've been playing with embeds it was natural to work with this aspect of Ask. That's how we worked mainly with [Pablo Cuadrado](https://x.com/pablocubico) on the [embeds engine](https://github.com/coralproject/elkhorn) with more than great results. In fact we don't even really know how but the Ask embeds often load much faster than the host websites ?. Besides working with the embeds y spent a long time with the Ask Front End that lives next to the Trust one and it's called [Cay](https://github.com/coralproject/cay).\n\nAsk is in beta and we already had experiencies collaborating with newsrooms, for example for the president election in the United States.\n\n### Talk\n\nThe last big project for the Coral Project in 2016 and likely the most expected one is [Talk](https://coralproject.net/products/talk.html). Just like Ask was built for unidirectional communication from audience to journalists, talk is about conversation. It is our approximation to the comments section on a website, but unlike any other comment system we want to create a configurable software so the comment box after your article stop being that and starts being something more appropriate and engaging to each audience.\n\nTalk is under heavy development and we expect a beta really soon. I also worked on the core development for this project but as in Ask, I could focus at least for a while in a specific aspect I was especially interested in: Comment moderation. I developed the moderation system that was then integrated into the administration tool. For the moderation tool I focused on user input speed and allowing the tool to be used without connectivity or under restricted data scenarios. That's how I met the [Offline first](http://offlinefirst.org/) community, and learned a lot about the development of Progressive Web Apps.\n\nAas anything we build at The Coral Project, Talk is Open Source and the Source Code is [available on GitHub](https://github.com/coralproject/talk).\n\n### Alternative Front End for Ask\n\n[
 ](/wp-content/uploads/2017/01/Screen-Shot-2017-01-12-at-12.48.56-PM.png)\n\nWhen we started planning Ask, one of the architectural goals was to decouple the Front End from the Back End and from the widget generation (forms and galleries). One of the effects of that decision is the possibility to create new ways to build the forms without using the tool we developed from inside the Coral Project but just our Back End API.\n\nTrying to showcase what is possible using the Ask API and also applying some tricky I learned while working on the Natural Language Processing aspect for [GuriVR](https://gurivr.com), I built an [alternative form generator](https://impronunciable.github.io/askme/) that instead of using the typical widgets drag & drop, it tries to engage in a conversation with the journalist, anticipating some things and making it reflecting about the questions asked and the input type of each question (E-mail, Number, Long text, etc). [The code](https://github.com/impronunciable/askme) is available in GitHub and I also talked a little about the input type inference on a [Source post](https://source.opennews.org/en-US/articles/low-budget-natural-language-processing/).\n\n### Ask WordPress Plugin\n\n[
 ](/wp-content/uploads/2017/01/Screen-Shot-2017-01-12-at-11.57.13-AM.png)\n\n\n\nWordPress plays a big part in the online news scenario and that's why creating integrations for our products is a priority. I built this integration to embed Ask Galleries and Forms and also being able to do administration tasks without leaving the WP admin. The plugin and it's code will be available soon.\n\n### Ask bot\n\n[
 ](/wp-content/uploads/2017/01/Screen-Shot-2017-01-12-at-12.02.06-PM.png)\n\n\n\nAfter a conversation with people at BuzzFeed Labs, when they showed us their [BuzzBot](https://github.com/buzzfeed-openlab/buzzbot) I thought about doing an Ask Bot that, when configured pointing to an Ask instance it talk with users that want to complete questionnaires.\n\nThe code is available on [GitHub](https://github.com/impronunciable/askbot) and I'm more than happy to help you implement it next to your ask implementation ?.\n\n### Coral Native\n\n[
 ](/wp-content/uploads/2017/01/quick.gif)\n\n\n\nDuring the first\"Coral Week\" at the Washington Post HQ, y took some hours to prototype a native mobile app for Trust, the first Coral Project product using React Native and also adding some proof of concepts for moderation in Talk. For example the above gif shows \"Quick moderation\" that allows comment moderation using our products APIs to moderate comments in a tinder-like fashion.\n\nI killed this project after that week since it wasn't aligned with the Coral roadmap and there were other priorities but it was pretty fun and a very good proof of concept on what can be done without modifying the core code from Trust. The other takeaway from this project for me was a proof that I could experiment with freedom at the Coral thanks to the support of the team, especially from [Andrew](https://x.com/losowsky) and [David](https://x.com/daviderwin).\n\n### Muddy\n\n[
 ](/wp-content/uploads/2017/01/Screen-Shot-2017-01-12-at-1.29.13-PM.png)\n\nAs mentioned before, one of my interests while working with Talk was related with comments moderation. Before even starting formally with the project I had some time to research and prototype a moderation app. This app never saw the light of day but most of the concepts were included into the current Talk moderation interface.\n\nThe codename for this project is Muddy (a tribute to Muddy Waters) and it's what is called a Progressive Web Application. The idea was to build a moderation app that could be used not only by moderators but also by journalists for example while riding the subway. I had 2 main goals at the time I developed it:\n\n * It must work under bad connectivity and offline scenarios\n * It should allow different types of input so users can emit moderation actions efficiently under diverse scenarios and use cases\n\nTo make the app work offline I used new web standards to make a \"Progressive Web Application\" that can cache resources and sync when the user is online the next time. On the input types side I worked with Speech Recognition, Keyboard Shortcuts and Touch gestures. I also combined what I did with \"Coral Native\" adding a \"Swipe mode\" with Tinder-like cards to make moderation more approachable.\n\nI mentioned some decisions taken for Muddy on my BAFrontend Progressive Web Apps [talk](https://www.acamica.com/charlas/45/un-electrizante-viaje-a-las-progressive-web-applications).\n\n## Personal project and other experiments\n\n### GuriVR\n\n[
 ](/wp-content/uploads/2017/01/Screen-Shot-2017-01-12-at-1.53.17-PM.png)\n\nIf there's a project that identifies my fellowship, then that is [GuriVR](https://gurivr.com). It was born from a question I asked myself during the 2015 MozFest after seeing great Virtual Reality related projects.: How far can we simplify the prototyping for VR experiences? Can we make it so a journalist (or any non-graphic-programmer) could do VR? This question mutated into a couple of prototypes before taking the final form of a Virtual Reality [online editor](https://gurivr.com) using natural language as the input both in English and Spanish, a [Twitter bot](https://x.com/guri_vr) that takes tweets and returns a VR scebe, a [Slack bot](https://github.com/OpenNewsLabs/guri-slack) and many more things.\n\nI [wrote](http://gurivr.com/guide) [extensively](https://source.opennews.org/en-US/articles/virtual-reality-rest-us/) on the technical side of the project, but there is another important aspect of the project that is tied to the Fellowship spirit on working with this project as I was interested in new things during the year and as you can see in the chart below my interest fluctuate a lot\n\n[
 ](/wp-content/uploads/2017/01/Screen-Shot-2017-01-12-at-1.55.12-PM.png)\n\nThis project is tied to my interests (and other people requests) but it also helped me test some ideas I had during the year, and that's why even if I worked from time to time during the whole fellowship on this project there were 2 specific nights where I wrote the key parts of Guri:\n\nThe first one was the night of the [March Hacks/Hackers New York meetup](https://www.meetup.com/hacks-hackers-nyc/events/229647574/). I had the idea of doing simple VR for everyone in my mind but I didn't have a clear way to implement it. During that Meetup, [Sisi Wei](https://x.com/sisiwei) from ProPublica showed how they translate articles to different languages using Google Docs and structuring the translations with [ArchieML](http://archieml.org/). That same night, after asking some questions on the matter to [Mike Tigas](https://x.com/mtigas), I named the project and started the first version. \"Write your story on a Google Docs, add annotations with ArchieML and get your VR piece\":\n\n\n\n[
 ](/wp-content/uploads/2017/01/Screen-Shot-2017-01-12-at-2.08.32-PM.png)\n\n\n\nThe second night was the one before presenting Guri to [Miguel Paz](https://x.com/miguelpaz) CUNY J-School class. At this point I had this project that took an annotated Google Docs and turned it into a VR scene, but I felt there was still a big learning curve for people not used to structure data (and I also wanted to impress the students). So that same night I started writing a parser that takes natural language from the Google Docs (instead of ArchieML annotations) and transforms it into a VR experience. The code I wrote that night is practically what we have now in the [NLP side](https://github.com/OpenNewsLabs/guri-vr/blob/master/client/shared/nlp.js) for GuriVR.com.\n\nJust as those 2 nights that changed the course of the project based in new ideas I had at the time, there were many more nights and days that piled more features into what you can use now on GuriVR. That hands-on spirit, that was transmitted from OpenNews, helped me develop my creativity and my interests on this project that now has many different use cases.\n\nAs an extra, Guri made me start participating on the [A-Frame](https://aframe.io) community, the VR Framework developed by Mozilla, and also their creators that were really helpful during the whole process.\n\n### Next.js\n\n[
 ](/wp-content/uploads/2017/01/next.png)\n\n\n\n[Guillermo](https://x.com/rauchg) showed me the main concepts for this Universal Front End Framework many months ago. That's why after spending many hours configuring a new project I asked him if they had plans to finish implementing the framework. That's how I started contributing to [Next](https://github.com/zeit/next.js).\n\nThis is one of the projects I enjoy both contributing, since I learned so much from the amazing [Zeit](https://zeit.co) team and also benefit as a user, a win-win.\n\n### Isopo\n\n[
 ](/wp-content/uploads/2017/01/Screen-Shot-2017-01-12-at-3.03.34-PM.png)\n\nDuring the Fellows work week in Buenos Aires, After [Martín](https://x.com/tincho_for_ever) showed me the Inception app for Android, It occurred to me to work on [Isopo](https://impronunciable.github.io/isopo/), a web technologies version of that app adding configurable audio filters. The idea is that to make Augmented Reality is not required to use the user camera, we can just listen what's coming from the phone microphone, apply some filters and feed it back to the ears, modifying our reality perception.\n\n### StoryTeller\n\n[
 ](/wp-content/uploads/2017/01/Screen-Shot-2017-01-12-at-3.07.10-PM.png)\n\n[StoryTeller](/storyteller/vr.html) is an experiment that uses speech recognition technologies to interact with WebVR, allowing VR exploration using the human voice.\n\nI didn't finish this project but it helped into the development of other [GuriVR](https://gurivr.com) features and showcase the posibilities we have to experiment in the VR space.\n\n### A-Frame Chartbuilder component\n\n[
 ](/wp-content/uploads/2017/01/Screen-Shot-2017-01-12-at-3.11.01-PM.png)\n\nExperimentingE with dataviz in 3d I created this [A-Frame](https://github.com/impronunciable/aframe-chartbuilder-component) component that takes charts generated with [ChartBuilder](https://quartz.github.io/Chartbuilder/) and renders it into a WebVR scene. This experiment talks about the interoperability between the WebVR world and popular web libraries such as d3js.\n\n### Shooting 360 at Coachella\n\n[
 ](/wp-content/uploads/2017/01/IMG_20160423_190623.jpg)\n\nI was working on WebVR projects involving a lot of 360 video but I've never filmed in my life, that's when [Miguel](https://x.com/miguelpaz) told me he had a student that was interested in filming with his new 360 camera and I met him immediately.\n\nJoseph told me he was about to go to Coachella to film in 360 so I got a press pass and we went to film to the festival. This was one of the experiences I couldn't have in a different context and that helped me understand much better the content producers I worked with.\n\n## Bla Bla Bla | Talks\n\n### WebVR & GuriVR\n\n[
 ](/wp-content/uploads/2017/01/Screen-Shot-2017-01-12-at-3.21.40-PM.png)\n\n * [SRCCON](http://schedule.srccon.org/#_session-webvr)\n * [MozFest](https://app.mozillafestival.org/#_session-568)\n * [Buenos](https://www.youtube.com/watch?v=r1d8Mc4pJSM)[Aires](https://www.youtube.com/watch?v=r1d8Mc4pJSM), [Miami](http://www.fiumediainnovationlab.com/mediaparty/) y [Africa](https://mediapartyafrica2016.sched.com/event/8aLK/creating-your-first-virtual-reality-experience-with-gurivr-and-a-frame) Media parties\n\n### Offline-First & Progressive Web Applications\n\n[
 ](/wp-content/uploads/2017/01/Screen-Shot-2017-01-12-at-3.36.56-PM.png)\n\n * [Encryption and](https://mediapartyafrica2016.sched.com/event/8YYq/encryption-and-offline-access-for-your-site)[offline access for your site](https://mediapartyafrica2016.sched.com/event/8YYq/encryption-and-offline-access-for-your-site) @ Africa Media Party\n * [Progressive Web Apps](https://www.acamica.com/charlas/45/un-electrizante-viaje-a-las-progressive-web-applications) @ BAFrontend\n * Offline-First Panel @ SXSW 2017\n\n## Articles\n\n * [Virtual Reality for the rest of us](https://source.opennews.org/en-US/articles/virtual-reality-rest-us/)\n * [Enabling Offline First Experiences on the Web with Service Workers](https://medium.com/offline-camp/enabling-offline-first-experiences-on-the-web-with-service-workers-e4bc8c773dae#.2wk7eulgn)\n * [Universal Rendering with Preact](/universal-rendering-with-preact/)\n * [Exploring new techniques on building composable widgets for the web](/exploring-new-techniques-building-composable-widgets-for-the-web/)\n * [Low-Budget Natural Language Processing](https://source.opennews.org/en-US/articles/low-budget-natural-language-processing/)\n * [Introduction to Preact and Webpack screencast](https://www.youtube.com/watch?v=nZqTzjl2DwE) \n ## \n\n## Fellow-Fellows\n\n[
 ](/wp-content/uploads/2017/01/2016fellows-3.jpg) \nI spent such a great time with my Fellow OpenNews Fellows, and as they say, I had the honor of introducing them into the Alfajor world.\n\n[
 ](/wp-content/uploads/2017/01/alfajor.jpg)\n\n## See you soon!\n\nI'm ending the fellowship and new things will start. I will be back to talk about my new (for now uncertain) adventures.\n\nSee you soon ?",
"date_published": "2017-01-12T20:27:16.000Z",
"date_modified": "2017-01-12T20:27:16.000Z",
"language": "en",
"tags": [
"Coral",
"opennews"
],
"authors": [
{
"name": "Dan Zajdband",
"url": "https://zajdband.com"
}
]
},
{
"id": "https://zajdband.com/fellowship-revisitado/",
"url": "https://zajdband.com/fellowship-revisitado/",
"title": "Fellowship revisitado",
"summary": "Un repaso por mis diez meses como Knight-Mozilla OpenNews Fellow en The Coral Project: Trust, Ask y las herramientas open source que construimos para mejorar la conversación en los medios.",
"content_text": "Siendo mañana mi último día como [Knight-Mozilla OpenNews Fellow](https://opennews.org/blog/introducing-2016-fellows/) siento la necesidad de hacer un repaso por estos últimos 10 meses para documentar aquello que hice, lo que dejé por la mitad y algunas cosas que me gustarían hacer en el futuro. Una aclaración importante es que si bien voy a hablar más que nada de proyectos, lo más importante que me llevo de este proceso es la gente que conocí, las experiencias que pude vivir y el aprendizaje que conlleva. Sin más introducción, esto es lo que estuve haciendo durante el año pasado:\n\n## The Coral Project\n\nLa organización que me tocó para colaborar durante mi Fellowship es [The Coral Project](https://coralproject.net), un proyecto de Mozilla Foundation en colaboración con el New York Times y el Washington Post creado para generar software de código abierto, investigación y herramientas para mejorar la conversación online alrededor del mundo del periodismo. Apenas llegué al Coral me encontré no solo con un equipo super diverso y proactivo sino también con un grupo humano genial, haciendo más simple y agradable mi trabajo.\n\nLo genial (y también un poco aterrador) del encare del fellowship tanto desde OpenNews como el Coral Project es de total libertad frente a mi trabajo. Ellos creyeron que podía hacer cosas interesantes y creativas y me dieron las herramientas y el tiempo para que pueda desarrollarlas. Si bien tuve mucho tiempo para experimentar con ideas, algunas fructiferas y otras que no funcionaron, mi trabajo principal con el proyecto fue en el desarrollo del core de las herramientas Open Source que se ofrecen a medios de todo tamaño para mejorar sus comunidades.\n\n### Trust\n\n[](/wp-content/uploads/2017/01/trust_screenshot.png)\n\n[Trust](https://coralproject.net/products/trust.html) es una herramienta que permite, mediante la aplicación de filtros, entender mejor el comportamiento de comentadores en un sitio. La idea principal es que mediante la generación de listas de usuarios, filtrada según variables customizables, se pueden detectar patrones de comportamiento y engagement. Una vez identificadas las variables que nos interesan de un grupo de comentadores podemos crear una lista y tomar acciones, por ejemplo una vez que un lector entra o sale de ella.\n\nSi bien ya se había comenzado con el desarrollo de Trust cuando empecé mi Fellowship, participé fuertemente del desarrollo de la herramienta, [especialmente desde el Front End](https://github.com/coralproject/cay/graphs/contributors). Tanto en Trust como en los subsiguientes proyectos en el Coral, usamos React y Redux para el Front End y Go, node.js y MongoDB en el Back End.\n\n### Ask\n\n[](/wp-content/uploads/2017/01/asking.gif)\n\nEl primer proyecto en el que pude participar desde el comienzo fue [Ask](https://coralproject.net/products/ask.html). Como su nombre lo índica, la idea de este producto es permitir hacerle preguntas a la audiencia, manejar las respuestas y embeber las mejores para mostrar de nuevo en el sitio.\n\nComo el Coral es un proyecto muy ambicioso, no se puede perder el tiempo. Como sabíamos que tanto para Ask como para otros proyectos íbamos a necesitar embeber widgets en sitios de terceros, a la semana de empezar el Fellowship, me puse a investigar buenas prácticas y nuevas ideas a la hora de crear embebibles y como resultado salió [un blogpost](/exploring-new-techniques-building-composable-widgets-for-the-web/), una pila de ideas gracias a los insights de [Ted Han](https://x.com/knowtheory) y mi acercamiento a [Preact](http://preactjs.com), un framework que me dio muchas satisfacciones durante el año (sí, un framework puede dar satisfacciones) y que terminé usando tanto en Ask como en proyectos personales. Así también conocí a [Jason](https://x.com/_developit) que es una gran inspiración respecto a como llevar un proyecto abierto.\n\nComo yo había estado jugando con embeds fue natural trabajar con ese aspecto de Ask. Así trabajamos principalmente con [Pablo Cuadrado](https://x.com/pablocubico) en el [engine de embeds](https://github.com/coralproject/elkhorn), con resultados más que satisfactorios. De hecho todavía no sabemos bien como pero los embeds de ask muchas veces cargan más rápido que los sitios que lo hostean ?. Además de trabajar con los embeds, pasé un buen tiempo con el Front End de Ask, que convive con el de Trust y se llama [Cay](https://github.com/coralproject/cay).\n\nAsk se encuentra en Beta y ya tuvimos experiencias de colaboraciones con medios, por ejemplo durante las elecciones en Estados Unidos.\n\n### Talk\n\nEl último proyecto grande del año para el Coral Project y posiblemente el más esperado es [Talk](https://coralproject.net/products/talk.html). Así como Ask está dirigido a la comunicación unidireccional desde la audiencia hacia el medio, talk es una conversación. Es nuestra aproximación a la sección de comentarios de un sitio, pero lo que queremos es hacer un software configurable para que la caja de comentarios abajo de tu sitio deje de serlo y sea algo más apropiado para cada audiencia.\n\nTalk se encuentra en pleno desarrollo y se espera una beta muy pronto. En este proyecto también trabajé en la programación del core pero así como en Ask, pude enfocarme, al menos por un tiempo, en un aspecto que me interesa en especial: La moderación. Desarrollé el sistema de moderación que luego fue integrado con el resto del admin de comentarios. Los temas que más me interesaron encarar fueron por un lado los tipos de input de usuario, donde jugué con reconocimiento y síntesis de voz, shortcuts y gestos touch y por otro lado la posibilidad de utilizar la aplicación en contextos donde el usuario se encuentra offline o con conectividad restringida. Así es como llegué a la comunidad [Offline first](http://offlinefirst.org/), de la que voy a hablar más adelante y al desarrollo de Progressive Web Apps.\n\nComo todo lo que hacemos en el Coral, Talk es Open Source y el código está [disponible en GitHub](https://github.com/coralproject/talk).\n\n### Front End alternativo para Ask\n\n[](/wp-content/uploads/2017/01/Screen-Shot-2017-01-12-at-12.48.56-PM.png)\n\nCuando pensamos Ask, una de las metas desde la arquitectura fue la de separar el Front End del Back End y también por otro lado de la generación de los widgets (formularios y galerías). Uno de los efectos de esa decisión es la posibilidad de crear visualizaciones de datos y f0rmas de generar formularios sin usar la herramienta que hicimos desde el Coral Project.\n\nQueriendo mostrar lo que es posible utilizando la API de Ask y también aplicando algunos trucos que aprendí haciendo la parte de Natural Language Processing de [GuriVR](https://gurivr.com), hice un [generador de formularios alternativo](https://impronunciable.github.io/askme/) que en vez de utilizar el típico drag & drop de widgets, intenta conversar con el periodista para hacerlo reflexionar sobre las preguntas y el tipo de input que va a ofrecer a los usuarios. [El código](https://github.com/impronunciable/askme) se encuentra en GitHub y hablé un poco sobre las inferencias de tipo de input en [un post para Source](https://source.opennews.org/en-US/articles/low-budget-natural-language-processing/).\n\n\n\n### Ask WordPress Plugin\n\n[](/wp-content/uploads/2017/01/Screen-Shot-2017-01-12-at-11.57.13-AM.png)\n\n\n\nWordPress esa gran parte de la vida de los medios online y es por eso que crear integraciones para nuestros productos es una prioridad grande. Construí esta integración para embeber formularios y galerías de Ask así como administrarlos desde el admin de WordPress. El plugin y código van a estar disponible muy pronto.\n\n### Ask bot\n\n[](/wp-content/uploads/2017/01/Screen-Shot-2017-01-12-at-12.02.06-PM.png)\n\n\n\nA raíz de una conversación con la gente de BuzzFeed Labs, hablando de su [BuzzBot](https://github.com/buzzfeed-openlab/buzzbot), se me ocurrió hacer un Ask Bot que, configurado apuntando a una instancia de Ask, conversa con usuarios que lo requieren para completar las encuestas del medio.\n\nEl código está en [GitHub](https://github.com/impronunciable/askbot) y estoy más que dispuesto a ayudar a implementarlo para cualquier usuario de Ask ?.\n\n### Coral Native\n\n[](/wp-content/uploads/2017/01/quick.gif)\n\n\n\nDurante la primera \"Coral Week\" en el Washington Post, me tomé algunas horas para prototipar una aplicación nativa para el celular para administrar Trust, el primer producto del Coral Project, usando React Native además de agregar algunas pruebas de concepto para la moderación en Talk. Por ejemplo este gif muestra \"Quick moderation\" que permite la moderación de comentarios, usando las APIs de nuestros productos para moderar comentarios al estilo tinder.\n\nMaté a este proyecto luego de esa semana porque no estaba alineado con el foco del Coral en ese momento y había otras prioridades por delante, sin embargo fue divertido y una buena prueba de concepto de lo que se puede hacer sin modificar el core del código del proyecto. La otra cosa que muestra este proyecto es la libertad con la que me pude mover en el Coral para experimentar gracias al apoyo de todo el equipo, especialmente de [Andrew](https://x.com/losowsky) y [David](https://x.com/daviderwin).\n\n### Muddy\n\n[](/wp-content/uploads/2017/01/Screen-Shot-2017-01-12-at-1.29.13-PM.png)\n\nComo mencioné anteriormente, una de mis inquietudes a la hora de trabajar con Talk está relacionada con la moderación de comentarios. Antes de arrancar el proyecto formalmente tuve un tiempo para poder investigar y prototipar una aplicación de moderación de comentarios. Si bien esta aplicación no salió a la luz, varios de estos conceptos fueron incorporados en la interface de moderación de comentarios de Talk.\n\nEl nombre en clave de este prototipo es Muddy (en homenaje a Muddy Waters) y es lo que se conoce como una Progressive Web Application. La idea es hacer una aplicación de moderación que puedan usar no solo moderadores sino también periodistas con algo de tiempo, por ejemplo viajando en subte o en un avión. Como expliqué anteriormente tuve 2 metas principales a la hora de desarrollarla:\n\n * Que funcione bajo circunstancias de mala o nula conectividad\n * Que permita distintos tipos de input para emitir acciones de moderación para hacer eficiente el trabajo bajo diversos escenarios\n\nPara lograr que funcione en \"modo offline\" utilicé nuevas tecnologías del navegador, haciendo una Progressive Web Application, que puede cachear recursos y sincronizar cuando el usuario vuelve a estar online. Respecto a los tipos de input trabajé con Speech Recognition, Atajos del teclado y gestos touch. También combiné esto con lo hecho en \"Coral Native\" añadiendo un \"modo swipe\" con tarjetas al estilo Tinder para hacer la moderación más amigable.\n\nDurante mi [charla](https://www.acamica.com/charlas/45/un-electrizante-viaje-a-las-progressive-web-applications) sobre Progressive Web Apps en BAFrontend hablé un poco sobre el desarrollo de esta aplicación.\n\n## Proyectos personales y otros experimentos\n\n### GuriVR\n\n[](/wp-content/uploads/2017/01/Screen-Shot-2017-01-12-at-1.53.17-PM.png)\n\nSi hay un proyecto que identifica my fellowship, entonces es este. [GuriVR](https://gurivr.com) nació de una pregunta que me hice en MozFest 2015 después de ver geniales proyectos de Realidad Virtual: ¿Cuanto podemos simplificar el proceso de prototipado de experiencias de VR?. ¿Podemos hacerlo tan simple que un periodista (o cualquier humano que no sea programador gráfico) pueda hacer VR?. Esta pregunta se transformó en un par de prototipos para luego ser un [editor online](https://gurivr.com) de Realidad Virtual utilizando lenguaje natural como input en inglés y español, un [bot de Twitter](https://x.com/guri_vr) que toma tweets y los transforma a VR, un [bot de Slack](https://github.com/OpenNewsLabs/guri-slack) y muchas cosas más.\n\nSi bien [escribí](http://gurivr.com/guide) [extensivamente](https://source.opennews.org/en-US/articles/virtual-reality-rest-us/) sobre el aspecto técnico, hay una parte fundamental de este proyecto y que está atado al espíritu del Fellowship es que fue desarrollado según mi nivel de interés durante el año, y como pueden ver en el siguiente gráfico mi interés es muy fluctuante\n\n[](/wp-content/uploads/2017/01/Screen-Shot-2017-01-12-at-1.55.12-PM.png)\n\nAdemás de estar atado a mi interés (y el de otra gente usandolo) este proyecto me sirvió para probar ideas que fui teniendo durante el año, es por eso que si bien fui aportando tiempo durante el año, hay 2 noches claves donde escribí las partes claves del proyecto:\n\nLa primera fue la noche de [Hacks/Hackers New York de Marzo](https://www.meetup.com/hacks-hackers-nyc/events/229647574/), yo venía con la idea de hacer VR simple para todos pero no venía con una certeza de como implementarlo. Durante esa Meetup, [Sisi Wei](https://x.com/sisiwei) de ProPublica mostró como traducen sus artículos a diferentes lenguajes usando Google Docs y estructurando las traducciones con [ArchieML](http://archieml.org/). Esa misma noche, luego de hacerle algunas preguntas al respecto a [Mike Tigas](https://x.com/mtigas), le puse un nombre al proyecto y empecé con la primera versión. Escribí tu historia en Google Docs, agregale anotaciones de ArchieML y obtené tu pieza de VR:\n\n\n\n[](/wp-content/uploads/2017/01/Screen-Shot-2017-01-12-at-2.08.32-PM.png)\n\n\n\nLa segunda noche fue la anterior a presentar Guri en la clase de [Miguel Paz](https://x.com/miguelpaz) en CUNY J-School. Si bien ya tenia este proyecto que tomaba un Google Docs anotado y devolvía una escena de Realidad Virtual, sentía que había una curva de aprendizaje muy grande para gente no acostumbrada a estructurar data (y también quería impresionar a los estudiantes). Entonces esa misma noche me puse a escribir un parser que tome lenguaje natural del mismo Google Docs (en vez de las anotaciones de ArchieML) y lo transforma en la experiencia de VR. El código que escribí esa noche (y un poco de la madrugada siguiente) es prácticamente lo que es hoy en día [la parte de NLP](https://github.com/OpenNewsLabs/guri-vr/blob/master/client/shared/nlp.js) en GuriVR.com.\n\nAsí como esas 2 noches cambiaron fuertemente el rumbo del proyecto basado en nuevas ideas que se me ocurrieron, hay muchas más noches, y muchos días que fueron agregando cada feature de Guri tal como existe hoy en día. Ese espíritu hands-on, que viene transmitida desde OpenNews ayudó a que pueda desarrollar mi creatividad y mis intereses en este producto que hoy en día tiene diversas aplicaciones.\n\nComo extra, Guri me acercó a la comunidad de [A-Frame](https://aframe.io), el Framework desarrollado por Mozilla para hacer Realidad Virtual, y a sus creadores que fueron de gran ayuda durante todo el proceso y con quienes pude interactuar durante el año.\n\n### Next.js\n\n[](/wp-content/uploads/2017/01/next.png)\n\n\n\n[Guillermo](https://x.com/rauchg) me mostró los conceptos principales de este Framework de Front End Universal, basado en React hace varios meses. Por eso después de pasar horas configurando un simple proyecto nuevo le pregunté si tenían planes de terminar de implementarlo. Así es como empecé a contribuir con [Next](https://github.com/zeit/next.js).\n\nEste es uno de esos proyectos que disfruto a la hora de contribuir porque aprendo mucho del genial equipo de [Zeit](https://zeit.co) y a la vez me beneficio como usuario, un win-win.\n\n### Isopo\n\n[](/wp-content/uploads/2017/01/Screen-Shot-2017-01-12-at-3.03.34-PM.png)\n\nLuego de que [Martín](https://x.com/tincho_for_ever) me mostrara la app de Inception para Android, durante la semana de trabajo con los fellows en Buenos Aires se me ocurrió hacer [Isopo](https://impronunciable.github.io/isopo/), una versión con tecnologías web y con filtros manejables por el usuario. La idea es que para hacer Realidad Aumentada no hace falta usar la cámara, sino que simplemente podemos escuchar lo que entra por el micrófono, aplicarle filtros y devolverlo a nuestros oidos, modificando nuestra percepción de la realidad.\n\n### StoryTeller\n\n[](/wp-content/uploads/2017/01/Screen-Shot-2017-01-12-at-3.07.10-PM.png)\n\n[StoryTeller](/storyteller/vr.html) es un experimento que utiliza tecnologías de reconocimiento de voz para interactuar con WebVR y posibilitar la exploración en Realidad Virtual utilizando la voz.\n\nSi bien este proyecto no fue terminado, ayudó al desarrollo de otras características de [GuriVR](https://gurivr.com) y como ejemplo de las posibilidades que tenemos a explorar en el ámbito de VR.\n\n\n\n### A-Frame Chartbuilder component\n\n[](/wp-content/uploads/2017/01/Screen-Shot-2017-01-12-at-3.11.01-PM.png)\n\nExperimentando con visualización de datos en 3d, creé este componente para [A-Frame](https://github.com/impronunciable/aframe-chartbuilder-component) que toma gráficos generados con [ChartBuilder](https://quartz.github.io/Chartbuilder/) y los dibuja en un entorno de WebVR. Este experimento muestra la interoperatibilidad entre el mundo de WebVR y otras librerías populares de la web como en este caso d3js.\n\n\n\n### Filmación 360 en Coachella\n\n[](/wp-content/uploads/2017/01/IMG_20160423_190623.jpg)\n\nEstaba trabajando con WebVR y mucho video 360 pero nunca había filmado en mi vida, entonces cuando [Miguel](https://x.com/miguelpaz) me dijo que tenía un alumno que estaba interesado en filmar con su nueva cámara me junté inmediatamente.\n\nJoseph me contó que se iba a Coachella a grabar 360 así que me conseguí un pase de prensa y nos fuimos a filmar al festival. Esta fue una de las experiencias que no podría haber tenido en otro momento y que me ayudó a entender mucho más a los productores de contenido con los que trabajé.\n\n\n\n## Bla Bla Bla | Charlas\n\n### WebVR y GuriVR\n\n[](/wp-content/uploads/2017/01/Screen-Shot-2017-01-12-at-3.21.40-PM.png)\n\n * [SRCCON](http://schedule.srccon.org/#_session-webvr)\n * [MozFest](https://app.mozillafestival.org/#_session-568)\n * [Buenos](https://www.youtube.com/watch?v=r1d8Mc4pJSM)[Aires](https://www.youtube.com/watch?v=r1d8Mc4pJSM), [Miami](http://www.fiumediainnovationlab.com/mediaparty/) y [Africa](https://mediapartyafrica2016.sched.com/event/8aLK/creating-your-first-virtual-reality-experience-with-gurivr-and-a-frame) Media parties\n\n### Offline-First y Progressive Web Applications\n\n[](/wp-content/uploads/2017/01/Screen-Shot-2017-01-12-at-3.36.56-PM.png)\n\n * [Encryption and](https://mediapartyafrica2016.sched.com/event/8YYq/encryption-and-offline-access-for-your-site)[offline access for your site](https://mediapartyafrica2016.sched.com/event/8YYq/encryption-and-offline-access-for-your-site) @ Africa Media Party\n * [Progressive Web Apps](https://www.acamica.com/charlas/45/un-electrizante-viaje-a-las-progressive-web-applications) @ BAFrontend\n * Offline-First Panel @ SXSW 2017\n\n## Artículos\n\n * [Virtual Reality for the rest of us](https://source.opennews.org/en-US/articles/virtual-reality-rest-us/)\n * [Enabling Offline First Experiences on the Web with Service Workers](https://medium.com/offline-camp/enabling-offline-first-experiences-on-the-web-with-service-workers-e4bc8c773dae#.2wk7eulgn)\n * [Universal Rendering with Preact](/universal-rendering-with-preact/)\n * [Exploring new techniques on building composable widgets for the web](/exploring-new-techniques-building-composable-widgets-for-the-web/)\n * [Low-Budget Natural Language Processing](https://source.opennews.org/en-US/articles/low-budget-natural-language-processing/)\n * [Introduction to Preact and Webpack screencast](https://www.youtube.com/watch?v=nZqTzjl2DwE) \n\n## Fellow-Fellows\n\n[](/wp-content/uploads/2017/01/2016fellows-3.jpg) \nPasé grandes momentos con mis Fellow OpenNews Fellows y, como ellos destacan, tuve el honor de introducirlos al mundo de los alfajores\n\n\n\n[](/wp-content/uploads/2017/01/alfajor.jpg)\n\n\n\n## Hasta pronto!\n\nTermina una etapa y comienza otra. Prontamente volveré a contar acerca de mis (por ahora inciertas) aventuras futuras.\n\nHasta la próxima ?",
"date_published": "2017-01-12T18:50:42.000Z",
"date_modified": "2017-01-12T18:50:42.000Z",
"language": "es",
"tags": [
"Coral",
"opennews"
],
"authors": [
{
"name": "Dan Zajdband",
"url": "https://zajdband.com"
}
]
},
{
"id": "https://zajdband.com/on-keeping-web-development-weird-for-the-next-generation/",
"url": "https://zajdband.com/on-keeping-web-development-weird-for-the-next-generation/",
"title": "On keeping Web Development weird for the next generation",
"summary": "Enjoying a Spring Friday in December, looking for ways to ruin my existence, I was inclined to read a couple of pending resources from the excellent Rust Docs. Catching errors at compile time, Static type-checking, immutable bindings, we can do these things now in JavaScript — that’s amazing!",
"content_text": "Enjoying a Spring Friday in December, looking for ways to ruin my existence, I was inclined to read a couple of pending resources from the excellent [Rust Docs](https://www.rust-lang.org/en-US/documentation.html). Catching errors at compile time, Static type-checking, immutable bindings, we can do these things now in JavaScript — that’s amazing!\n\nBut wait! Rust is a System Programming Language, its main goal is to make programs work as intended, super fast and avoiding memory management issues. I'd love my payment processor, self-driving car, or my OS to be written in a language based on these principles. Don’t get me wrong it's not that I don’t want my home banking website to mistakenly empty my account or Amazon to offer me a product again as soon as I buy it ?. The issue here is that in order to guarantee all the promises we get from a language we must concede some freedom at development time.\n\nYour program correctness and memory safety is based on following a number of unbreakable rules. If you try to break them, you’ll get a message from the compiler and your program won’t run. In web development, we don’t usually have these limitations. If you ever used the Internet you’ll know that this freedom can lead to a lot of broken sites and apps. Because of that, it is great that every day we get new tools for improving our websites and apps.\n\n \n\n
](/wp-content/uploads/2017/01/alfajor.jpg)\n\n## See you soon!\n\nI'm ending the fellowship and new things will start. I will be back to talk about my new (for now uncertain) adventures.\n\nSee you soon ?",
"date_published": "2017-01-12T20:27:16.000Z",
"date_modified": "2017-01-12T20:27:16.000Z",
"language": "en",
"tags": [
"Coral",
"opennews"
],
"authors": [
{
"name": "Dan Zajdband",
"url": "https://zajdband.com"
}
]
},
{
"id": "https://zajdband.com/fellowship-revisitado/",
"url": "https://zajdband.com/fellowship-revisitado/",
"title": "Fellowship revisitado",
"summary": "Un repaso por mis diez meses como Knight-Mozilla OpenNews Fellow en The Coral Project: Trust, Ask y las herramientas open source que construimos para mejorar la conversación en los medios.",
"content_text": "Siendo mañana mi último día como [Knight-Mozilla OpenNews Fellow](https://opennews.org/blog/introducing-2016-fellows/) siento la necesidad de hacer un repaso por estos últimos 10 meses para documentar aquello que hice, lo que dejé por la mitad y algunas cosas que me gustarían hacer en el futuro. Una aclaración importante es que si bien voy a hablar más que nada de proyectos, lo más importante que me llevo de este proceso es la gente que conocí, las experiencias que pude vivir y el aprendizaje que conlleva. Sin más introducción, esto es lo que estuve haciendo durante el año pasado:\n\n## The Coral Project\n\nLa organización que me tocó para colaborar durante mi Fellowship es [The Coral Project](https://coralproject.net), un proyecto de Mozilla Foundation en colaboración con el New York Times y el Washington Post creado para generar software de código abierto, investigación y herramientas para mejorar la conversación online alrededor del mundo del periodismo. Apenas llegué al Coral me encontré no solo con un equipo super diverso y proactivo sino también con un grupo humano genial, haciendo más simple y agradable mi trabajo.\n\nLo genial (y también un poco aterrador) del encare del fellowship tanto desde OpenNews como el Coral Project es de total libertad frente a mi trabajo. Ellos creyeron que podía hacer cosas interesantes y creativas y me dieron las herramientas y el tiempo para que pueda desarrollarlas. Si bien tuve mucho tiempo para experimentar con ideas, algunas fructiferas y otras que no funcionaron, mi trabajo principal con el proyecto fue en el desarrollo del core de las herramientas Open Source que se ofrecen a medios de todo tamaño para mejorar sus comunidades.\n\n### Trust\n\n[](/wp-content/uploads/2017/01/trust_screenshot.png)\n\n[Trust](https://coralproject.net/products/trust.html) es una herramienta que permite, mediante la aplicación de filtros, entender mejor el comportamiento de comentadores en un sitio. La idea principal es que mediante la generación de listas de usuarios, filtrada según variables customizables, se pueden detectar patrones de comportamiento y engagement. Una vez identificadas las variables que nos interesan de un grupo de comentadores podemos crear una lista y tomar acciones, por ejemplo una vez que un lector entra o sale de ella.\n\nSi bien ya se había comenzado con el desarrollo de Trust cuando empecé mi Fellowship, participé fuertemente del desarrollo de la herramienta, [especialmente desde el Front End](https://github.com/coralproject/cay/graphs/contributors). Tanto en Trust como en los subsiguientes proyectos en el Coral, usamos React y Redux para el Front End y Go, node.js y MongoDB en el Back End.\n\n### Ask\n\n[](/wp-content/uploads/2017/01/asking.gif)\n\nEl primer proyecto en el que pude participar desde el comienzo fue [Ask](https://coralproject.net/products/ask.html). Como su nombre lo índica, la idea de este producto es permitir hacerle preguntas a la audiencia, manejar las respuestas y embeber las mejores para mostrar de nuevo en el sitio.\n\nComo el Coral es un proyecto muy ambicioso, no se puede perder el tiempo. Como sabíamos que tanto para Ask como para otros proyectos íbamos a necesitar embeber widgets en sitios de terceros, a la semana de empezar el Fellowship, me puse a investigar buenas prácticas y nuevas ideas a la hora de crear embebibles y como resultado salió [un blogpost](/exploring-new-techniques-building-composable-widgets-for-the-web/), una pila de ideas gracias a los insights de [Ted Han](https://x.com/knowtheory) y mi acercamiento a [Preact](http://preactjs.com), un framework que me dio muchas satisfacciones durante el año (sí, un framework puede dar satisfacciones) y que terminé usando tanto en Ask como en proyectos personales. Así también conocí a [Jason](https://x.com/_developit) que es una gran inspiración respecto a como llevar un proyecto abierto.\n\nComo yo había estado jugando con embeds fue natural trabajar con ese aspecto de Ask. Así trabajamos principalmente con [Pablo Cuadrado](https://x.com/pablocubico) en el [engine de embeds](https://github.com/coralproject/elkhorn), con resultados más que satisfactorios. De hecho todavía no sabemos bien como pero los embeds de ask muchas veces cargan más rápido que los sitios que lo hostean ?. Además de trabajar con los embeds, pasé un buen tiempo con el Front End de Ask, que convive con el de Trust y se llama [Cay](https://github.com/coralproject/cay).\n\nAsk se encuentra en Beta y ya tuvimos experiencias de colaboraciones con medios, por ejemplo durante las elecciones en Estados Unidos.\n\n### Talk\n\nEl último proyecto grande del año para el Coral Project y posiblemente el más esperado es [Talk](https://coralproject.net/products/talk.html). Así como Ask está dirigido a la comunicación unidireccional desde la audiencia hacia el medio, talk es una conversación. Es nuestra aproximación a la sección de comentarios de un sitio, pero lo que queremos es hacer un software configurable para que la caja de comentarios abajo de tu sitio deje de serlo y sea algo más apropiado para cada audiencia.\n\nTalk se encuentra en pleno desarrollo y se espera una beta muy pronto. En este proyecto también trabajé en la programación del core pero así como en Ask, pude enfocarme, al menos por un tiempo, en un aspecto que me interesa en especial: La moderación. Desarrollé el sistema de moderación que luego fue integrado con el resto del admin de comentarios. Los temas que más me interesaron encarar fueron por un lado los tipos de input de usuario, donde jugué con reconocimiento y síntesis de voz, shortcuts y gestos touch y por otro lado la posibilidad de utilizar la aplicación en contextos donde el usuario se encuentra offline o con conectividad restringida. Así es como llegué a la comunidad [Offline first](http://offlinefirst.org/), de la que voy a hablar más adelante y al desarrollo de Progressive Web Apps.\n\nComo todo lo que hacemos en el Coral, Talk es Open Source y el código está [disponible en GitHub](https://github.com/coralproject/talk).\n\n### Front End alternativo para Ask\n\n[](/wp-content/uploads/2017/01/Screen-Shot-2017-01-12-at-12.48.56-PM.png)\n\nCuando pensamos Ask, una de las metas desde la arquitectura fue la de separar el Front End del Back End y también por otro lado de la generación de los widgets (formularios y galerías). Uno de los efectos de esa decisión es la posibilidad de crear visualizaciones de datos y f0rmas de generar formularios sin usar la herramienta que hicimos desde el Coral Project.\n\nQueriendo mostrar lo que es posible utilizando la API de Ask y también aplicando algunos trucos que aprendí haciendo la parte de Natural Language Processing de [GuriVR](https://gurivr.com), hice un [generador de formularios alternativo](https://impronunciable.github.io/askme/) que en vez de utilizar el típico drag & drop de widgets, intenta conversar con el periodista para hacerlo reflexionar sobre las preguntas y el tipo de input que va a ofrecer a los usuarios. [El código](https://github.com/impronunciable/askme) se encuentra en GitHub y hablé un poco sobre las inferencias de tipo de input en [un post para Source](https://source.opennews.org/en-US/articles/low-budget-natural-language-processing/).\n\n\n\n### Ask WordPress Plugin\n\n[](/wp-content/uploads/2017/01/Screen-Shot-2017-01-12-at-11.57.13-AM.png)\n\n\n\nWordPress esa gran parte de la vida de los medios online y es por eso que crear integraciones para nuestros productos es una prioridad grande. Construí esta integración para embeber formularios y galerías de Ask así como administrarlos desde el admin de WordPress. El plugin y código van a estar disponible muy pronto.\n\n### Ask bot\n\n[](/wp-content/uploads/2017/01/Screen-Shot-2017-01-12-at-12.02.06-PM.png)\n\n\n\nA raíz de una conversación con la gente de BuzzFeed Labs, hablando de su [BuzzBot](https://github.com/buzzfeed-openlab/buzzbot), se me ocurrió hacer un Ask Bot que, configurado apuntando a una instancia de Ask, conversa con usuarios que lo requieren para completar las encuestas del medio.\n\nEl código está en [GitHub](https://github.com/impronunciable/askbot) y estoy más que dispuesto a ayudar a implementarlo para cualquier usuario de Ask ?.\n\n### Coral Native\n\n[](/wp-content/uploads/2017/01/quick.gif)\n\n\n\nDurante la primera \"Coral Week\" en el Washington Post, me tomé algunas horas para prototipar una aplicación nativa para el celular para administrar Trust, el primer producto del Coral Project, usando React Native además de agregar algunas pruebas de concepto para la moderación en Talk. Por ejemplo este gif muestra \"Quick moderation\" que permite la moderación de comentarios, usando las APIs de nuestros productos para moderar comentarios al estilo tinder.\n\nMaté a este proyecto luego de esa semana porque no estaba alineado con el foco del Coral en ese momento y había otras prioridades por delante, sin embargo fue divertido y una buena prueba de concepto de lo que se puede hacer sin modificar el core del código del proyecto. La otra cosa que muestra este proyecto es la libertad con la que me pude mover en el Coral para experimentar gracias al apoyo de todo el equipo, especialmente de [Andrew](https://x.com/losowsky) y [David](https://x.com/daviderwin).\n\n### Muddy\n\n[](/wp-content/uploads/2017/01/Screen-Shot-2017-01-12-at-1.29.13-PM.png)\n\nComo mencioné anteriormente, una de mis inquietudes a la hora de trabajar con Talk está relacionada con la moderación de comentarios. Antes de arrancar el proyecto formalmente tuve un tiempo para poder investigar y prototipar una aplicación de moderación de comentarios. Si bien esta aplicación no salió a la luz, varios de estos conceptos fueron incorporados en la interface de moderación de comentarios de Talk.\n\nEl nombre en clave de este prototipo es Muddy (en homenaje a Muddy Waters) y es lo que se conoce como una Progressive Web Application. La idea es hacer una aplicación de moderación que puedan usar no solo moderadores sino también periodistas con algo de tiempo, por ejemplo viajando en subte o en un avión. Como expliqué anteriormente tuve 2 metas principales a la hora de desarrollarla:\n\n * Que funcione bajo circunstancias de mala o nula conectividad\n * Que permita distintos tipos de input para emitir acciones de moderación para hacer eficiente el trabajo bajo diversos escenarios\n\nPara lograr que funcione en \"modo offline\" utilicé nuevas tecnologías del navegador, haciendo una Progressive Web Application, que puede cachear recursos y sincronizar cuando el usuario vuelve a estar online. Respecto a los tipos de input trabajé con Speech Recognition, Atajos del teclado y gestos touch. También combiné esto con lo hecho en \"Coral Native\" añadiendo un \"modo swipe\" con tarjetas al estilo Tinder para hacer la moderación más amigable.\n\nDurante mi [charla](https://www.acamica.com/charlas/45/un-electrizante-viaje-a-las-progressive-web-applications) sobre Progressive Web Apps en BAFrontend hablé un poco sobre el desarrollo de esta aplicación.\n\n## Proyectos personales y otros experimentos\n\n### GuriVR\n\n[](/wp-content/uploads/2017/01/Screen-Shot-2017-01-12-at-1.53.17-PM.png)\n\nSi hay un proyecto que identifica my fellowship, entonces es este. [GuriVR](https://gurivr.com) nació de una pregunta que me hice en MozFest 2015 después de ver geniales proyectos de Realidad Virtual: ¿Cuanto podemos simplificar el proceso de prototipado de experiencias de VR?. ¿Podemos hacerlo tan simple que un periodista (o cualquier humano que no sea programador gráfico) pueda hacer VR?. Esta pregunta se transformó en un par de prototipos para luego ser un [editor online](https://gurivr.com) de Realidad Virtual utilizando lenguaje natural como input en inglés y español, un [bot de Twitter](https://x.com/guri_vr) que toma tweets y los transforma a VR, un [bot de Slack](https://github.com/OpenNewsLabs/guri-slack) y muchas cosas más.\n\nSi bien [escribí](http://gurivr.com/guide) [extensivamente](https://source.opennews.org/en-US/articles/virtual-reality-rest-us/) sobre el aspecto técnico, hay una parte fundamental de este proyecto y que está atado al espíritu del Fellowship es que fue desarrollado según mi nivel de interés durante el año, y como pueden ver en el siguiente gráfico mi interés es muy fluctuante\n\n[](/wp-content/uploads/2017/01/Screen-Shot-2017-01-12-at-1.55.12-PM.png)\n\nAdemás de estar atado a mi interés (y el de otra gente usandolo) este proyecto me sirvió para probar ideas que fui teniendo durante el año, es por eso que si bien fui aportando tiempo durante el año, hay 2 noches claves donde escribí las partes claves del proyecto:\n\nLa primera fue la noche de [Hacks/Hackers New York de Marzo](https://www.meetup.com/hacks-hackers-nyc/events/229647574/), yo venía con la idea de hacer VR simple para todos pero no venía con una certeza de como implementarlo. Durante esa Meetup, [Sisi Wei](https://x.com/sisiwei) de ProPublica mostró como traducen sus artículos a diferentes lenguajes usando Google Docs y estructurando las traducciones con [ArchieML](http://archieml.org/). Esa misma noche, luego de hacerle algunas preguntas al respecto a [Mike Tigas](https://x.com/mtigas), le puse un nombre al proyecto y empecé con la primera versión. Escribí tu historia en Google Docs, agregale anotaciones de ArchieML y obtené tu pieza de VR:\n\n\n\n[](/wp-content/uploads/2017/01/Screen-Shot-2017-01-12-at-2.08.32-PM.png)\n\n\n\nLa segunda noche fue la anterior a presentar Guri en la clase de [Miguel Paz](https://x.com/miguelpaz) en CUNY J-School. Si bien ya tenia este proyecto que tomaba un Google Docs anotado y devolvía una escena de Realidad Virtual, sentía que había una curva de aprendizaje muy grande para gente no acostumbrada a estructurar data (y también quería impresionar a los estudiantes). Entonces esa misma noche me puse a escribir un parser que tome lenguaje natural del mismo Google Docs (en vez de las anotaciones de ArchieML) y lo transforma en la experiencia de VR. El código que escribí esa noche (y un poco de la madrugada siguiente) es prácticamente lo que es hoy en día [la parte de NLP](https://github.com/OpenNewsLabs/guri-vr/blob/master/client/shared/nlp.js) en GuriVR.com.\n\nAsí como esas 2 noches cambiaron fuertemente el rumbo del proyecto basado en nuevas ideas que se me ocurrieron, hay muchas más noches, y muchos días que fueron agregando cada feature de Guri tal como existe hoy en día. Ese espíritu hands-on, que viene transmitida desde OpenNews ayudó a que pueda desarrollar mi creatividad y mis intereses en este producto que hoy en día tiene diversas aplicaciones.\n\nComo extra, Guri me acercó a la comunidad de [A-Frame](https://aframe.io), el Framework desarrollado por Mozilla para hacer Realidad Virtual, y a sus creadores que fueron de gran ayuda durante todo el proceso y con quienes pude interactuar durante el año.\n\n### Next.js\n\n[](/wp-content/uploads/2017/01/next.png)\n\n\n\n[Guillermo](https://x.com/rauchg) me mostró los conceptos principales de este Framework de Front End Universal, basado en React hace varios meses. Por eso después de pasar horas configurando un simple proyecto nuevo le pregunté si tenían planes de terminar de implementarlo. Así es como empecé a contribuir con [Next](https://github.com/zeit/next.js).\n\nEste es uno de esos proyectos que disfruto a la hora de contribuir porque aprendo mucho del genial equipo de [Zeit](https://zeit.co) y a la vez me beneficio como usuario, un win-win.\n\n### Isopo\n\n[](/wp-content/uploads/2017/01/Screen-Shot-2017-01-12-at-3.03.34-PM.png)\n\nLuego de que [Martín](https://x.com/tincho_for_ever) me mostrara la app de Inception para Android, durante la semana de trabajo con los fellows en Buenos Aires se me ocurrió hacer [Isopo](https://impronunciable.github.io/isopo/), una versión con tecnologías web y con filtros manejables por el usuario. La idea es que para hacer Realidad Aumentada no hace falta usar la cámara, sino que simplemente podemos escuchar lo que entra por el micrófono, aplicarle filtros y devolverlo a nuestros oidos, modificando nuestra percepción de la realidad.\n\n### StoryTeller\n\n[](/wp-content/uploads/2017/01/Screen-Shot-2017-01-12-at-3.07.10-PM.png)\n\n[StoryTeller](/storyteller/vr.html) es un experimento que utiliza tecnologías de reconocimiento de voz para interactuar con WebVR y posibilitar la exploración en Realidad Virtual utilizando la voz.\n\nSi bien este proyecto no fue terminado, ayudó al desarrollo de otras características de [GuriVR](https://gurivr.com) y como ejemplo de las posibilidades que tenemos a explorar en el ámbito de VR.\n\n\n\n### A-Frame Chartbuilder component\n\n[](/wp-content/uploads/2017/01/Screen-Shot-2017-01-12-at-3.11.01-PM.png)\n\nExperimentando con visualización de datos en 3d, creé este componente para [A-Frame](https://github.com/impronunciable/aframe-chartbuilder-component) que toma gráficos generados con [ChartBuilder](https://quartz.github.io/Chartbuilder/) y los dibuja en un entorno de WebVR. Este experimento muestra la interoperatibilidad entre el mundo de WebVR y otras librerías populares de la web como en este caso d3js.\n\n\n\n### Filmación 360 en Coachella\n\n[](/wp-content/uploads/2017/01/IMG_20160423_190623.jpg)\n\nEstaba trabajando con WebVR y mucho video 360 pero nunca había filmado en mi vida, entonces cuando [Miguel](https://x.com/miguelpaz) me dijo que tenía un alumno que estaba interesado en filmar con su nueva cámara me junté inmediatamente.\n\nJoseph me contó que se iba a Coachella a grabar 360 así que me conseguí un pase de prensa y nos fuimos a filmar al festival. Esta fue una de las experiencias que no podría haber tenido en otro momento y que me ayudó a entender mucho más a los productores de contenido con los que trabajé.\n\n\n\n## Bla Bla Bla | Charlas\n\n### WebVR y GuriVR\n\n[](/wp-content/uploads/2017/01/Screen-Shot-2017-01-12-at-3.21.40-PM.png)\n\n * [SRCCON](http://schedule.srccon.org/#_session-webvr)\n * [MozFest](https://app.mozillafestival.org/#_session-568)\n * [Buenos](https://www.youtube.com/watch?v=r1d8Mc4pJSM)[Aires](https://www.youtube.com/watch?v=r1d8Mc4pJSM), [Miami](http://www.fiumediainnovationlab.com/mediaparty/) y [Africa](https://mediapartyafrica2016.sched.com/event/8aLK/creating-your-first-virtual-reality-experience-with-gurivr-and-a-frame) Media parties\n\n### Offline-First y Progressive Web Applications\n\n[](/wp-content/uploads/2017/01/Screen-Shot-2017-01-12-at-3.36.56-PM.png)\n\n * [Encryption and](https://mediapartyafrica2016.sched.com/event/8YYq/encryption-and-offline-access-for-your-site)[offline access for your site](https://mediapartyafrica2016.sched.com/event/8YYq/encryption-and-offline-access-for-your-site) @ Africa Media Party\n * [Progressive Web Apps](https://www.acamica.com/charlas/45/un-electrizante-viaje-a-las-progressive-web-applications) @ BAFrontend\n * Offline-First Panel @ SXSW 2017\n\n## Artículos\n\n * [Virtual Reality for the rest of us](https://source.opennews.org/en-US/articles/virtual-reality-rest-us/)\n * [Enabling Offline First Experiences on the Web with Service Workers](https://medium.com/offline-camp/enabling-offline-first-experiences-on-the-web-with-service-workers-e4bc8c773dae#.2wk7eulgn)\n * [Universal Rendering with Preact](/universal-rendering-with-preact/)\n * [Exploring new techniques on building composable widgets for the web](/exploring-new-techniques-building-composable-widgets-for-the-web/)\n * [Low-Budget Natural Language Processing](https://source.opennews.org/en-US/articles/low-budget-natural-language-processing/)\n * [Introduction to Preact and Webpack screencast](https://www.youtube.com/watch?v=nZqTzjl2DwE) \n\n## Fellow-Fellows\n\n[](/wp-content/uploads/2017/01/2016fellows-3.jpg) \nPasé grandes momentos con mis Fellow OpenNews Fellows y, como ellos destacan, tuve el honor de introducirlos al mundo de los alfajores\n\n\n\n[](/wp-content/uploads/2017/01/alfajor.jpg)\n\n\n\n## Hasta pronto!\n\nTermina una etapa y comienza otra. Prontamente volveré a contar acerca de mis (por ahora inciertas) aventuras futuras.\n\nHasta la próxima ?",
"date_published": "2017-01-12T18:50:42.000Z",
"date_modified": "2017-01-12T18:50:42.000Z",
"language": "es",
"tags": [
"Coral",
"opennews"
],
"authors": [
{
"name": "Dan Zajdband",
"url": "https://zajdband.com"
}
]
},
{
"id": "https://zajdband.com/on-keeping-web-development-weird-for-the-next-generation/",
"url": "https://zajdband.com/on-keeping-web-development-weird-for-the-next-generation/",
"title": "On keeping Web Development weird for the next generation",
"summary": "Enjoying a Spring Friday in December, looking for ways to ruin my existence, I was inclined to read a couple of pending resources from the excellent Rust Docs. Catching errors at compile time, Static type-checking, immutable bindings, we can do these things now in JavaScript — that’s amazing!",
"content_text": "Enjoying a Spring Friday in December, looking for ways to ruin my existence, I was inclined to read a couple of pending resources from the excellent [Rust Docs](https://www.rust-lang.org/en-US/documentation.html). Catching errors at compile time, Static type-checking, immutable bindings, we can do these things now in JavaScript — that’s amazing!\n\nBut wait! Rust is a System Programming Language, its main goal is to make programs work as intended, super fast and avoiding memory management issues. I'd love my payment processor, self-driving car, or my OS to be written in a language based on these principles. Don’t get me wrong it's not that I don’t want my home banking website to mistakenly empty my account or Amazon to offer me a product again as soon as I buy it ?. The issue here is that in order to guarantee all the promises we get from a language we must concede some freedom at development time.\n\nYour program correctness and memory safety is based on following a number of unbreakable rules. If you try to break them, you’ll get a message from the compiler and your program won’t run. In web development, we don’t usually have these limitations. If you ever used the Internet you’ll know that this freedom can lead to a lot of broken sites and apps. Because of that, it is great that every day we get new tools for improving our websites and apps.\n\n \n\n \n\n
\n\n\n Messi can be Messy and awesome, like web dev\n
\n\nIt worries me that we are focusing too much on making the web correct, fast and scalable that we forget that part of the beauty in Web Dev is about being able to transmit your ideas and unleash your creativity with the tiniest possible friction. [I](/screencast-in-spanish-introduccion-a-preact-con-webpack-y-babel/) [love](/universal-rendering-with-preact/) [to](/exploring-new-techniques-building-composable-widgets-for-the-web/) [use](https://gurivr.com) (p)react, Typescript, Flow, Babel and Webpack for my apps. But I also love to be able to throw a bunch of script tags and create [a weird VR scene](https://impronunciable.github.io/webvr-experiments/village/) or a [crazy Web Audio API experiment](https://impronunciable.github.io/isopo/).\n\nI don’t want part of the next generation of web developers to think that you need to transpile, type-check, use a package manager, a framework for UI, another framework for global state, and a Service Worker automatic generation tool to be able to play around or to do an interactive piece. I think these concepts are important for some part of the web, but not for the web ecosystem as a whole. Being messy is a big part of learning, even to learn that it’s not the best path.\n\nThe question will then be: Are we keeping web development weird enough?\n\nManatee drawing by Jimmie \nThanks Sandhya for the spell and grammar check 🙂", "date_published": "2016-12-02T09:09:06.000Z", "date_modified": "2016-12-02T09:09:06.000Z", "language": "en", "tags": [ "opennews", "thoughts", "prototyping" ], "authors": [ { "name": "Dan Zajdband", "url": "https://zajdband.com" } ] }, { "id": "https://zajdband.com/raros-peinados-nuevos-javascript-y-crisis-de-identidad-en-la-era-del-transpilador/", "url": "https://zajdband.com/raros-peinados-nuevos-javascript-y-crisis-de-identidad-en-la-era-del-transpilador/", "title": "Raros peinados nuevos - JavaScript y crísis de identidad en la era del transpilador", "summary": "Una oda a JavaScript", "content_text": "[ ](/wp-content/uploads/2016/11/139403463_0369202da2_z.jpg)\n\n>
  \n\n \n\nPor qué digo que **hoy te amo ya y ya es mañana**? Porque si bien todos los hipsters estamos llenando Github con Arrow Functions, async/await, HTML y CSS adentro del JS, tipado estático, promesas sobre el bidet y clases, todas estas construcciones son **elecciones** que podemos hacer en el ámbito web. **La era del transpilador es también la era de la modularización**. Si hacemos las cosas bien, y creo que estamos yendo para ese lado, no te tiene que importar demasiado que tu vecino use typescript, (p)react, jQuery mobile, Sencha Touch o simple Vanilla JS. Lo que importa no es tu capacidad de masturbación mental frente a nuevas tecnologías, sino la **experiencia de usuario**. Si tu app carga rápido y funciona bien tus amiguitos van a quererte y vas a ser exitoso/a en el arte del amor.\n\nEntonces para cerrar y dejarte en paz con las 20 pestañas de posts motivacionales de Medium te pido que no pienses si está bien o mal el uso de nuevas construcciones en un lenguaje, sino en como podemos convivir en este rincón del multiverso y preocuparnos por cosas importantes como el homenaje a [Diego Milito](https://www.youtube.com/watch?v=2paikH7sGeQ).\n\n ",
"date_published": "2016-11-29T17:40:19.000Z",
"date_modified": "2016-11-29T17:40:19.000Z",
"language": "es",
"tags": [
"JavaScript"
],
"authors": [
{
"name": "Dan Zajdband",
"url": "https://zajdband.com"
}
]
},
{
"id": "https://zajdband.com/screencast-in-spanish-introduccion-a-preact-con-webpack-y-babel/",
"url": "https://zajdband.com/screencast-in-spanish-introduccion-a-preact-con-webpack-y-babel/",
"title": "Screencast: Introduction to Preact with webpack and babel",
"summary": "In this video I show how to setup a Preact project using webpack and babel, explaining what's going on on each step.",
"content_text": "",
"date_published": "2016-07-01T04:22:28.000Z",
"date_modified": "2016-07-01T04:22:28.000Z",
"language": "en",
"tags": [
"webpack",
"babel"
],
"authors": [
{
"name": "Dan Zajdband",
"url": "https://zajdband.com"
}
]
},
{
"id": "https://zajdband.com/universal-rendering-with-preact/",
"url": "https://zajdband.com/universal-rendering-with-preact/",
"title": "Universal rendering with preact",
"summary": "In this article I explain a technique and conventions to follow in order to achieve Universal rendering (the ability to render an app both client and server side) using preact, node and redux.",
"content_text": "As [@rauchg](https://x.com/rauchg) stated, [server renderer pages are not optional](https://rauchg.com/2014/7-principles-of-rich-web-applications/#server-rendered-pages-are-not-optional). On my journey redoing the [HackDash](https://hackdash.org) front-end I’m trying to apply best practices on this software piece, so implementing Universal rendering was one of the first challenges.\n\nIn this article I explain a technique and conventions to follow in order to achieve Universal rendering (the ability to render an app both client and server side) using [preact](https://preactjs.com/), node and [redux](https://redux.js.org). This is not the only way to do it but it can help you understand some concepts behind this technique. You can see a demo of the Work in Progress using [now](https://zeit.co/now) for the deployment [here](https://hackdash-front-pgalvabhlc.now.sh), the code is [Open-Source](https://github.com/impronunciable/hackdash-front).\n\n**TL;DR**\n\nAn easy way to develop this kind of single-page apps with universal rendering is to break your app in pages (in my case each page refer [1-on-1 with a route](https://github.com/impronunciable/hackdash-front/blob/master/src/components/App.js#L13)) and provide an initial fetch redux action for each page. Then, on the server, [provide a middleware](https://github.com/impronunciable/hackdash-front/blob/master/server.js#L25) to fetch that data and when you get the redux action that indicates the data is loaded, [render the page](https://github.com/impronunciable/hackdash-front/blob/master/template.js) along with a JSON representation of the initial state of the app.\n\n**Transpile your server-side code (too)**\n\nBecause we want to render our client-side preact app on the server, importing the client code into the server, we need to transpile our node code too. Webpack allows to specify a [node target](https://github.com/impronunciable/hackdash-front/blob/master/webpack.config.back.js) that deals for this specific environment while helping with, for example, the jsx components.\n\n**Avoid the usage of browser specific variables**\n\nUsing browser-only variables like _window_ and _document_ will break your server builds. If you must use them you can access to [global polyfills](https://github.com/Raynos/global) or declare them as external on your webpack configuration.\n\n**Share as much code as you can**\n\nThe only difference between the code executed in the server and the client is a [minimal express app](https://github.com/impronunciable/hackdash-front/blob/master/server.js). This code is in charge of fetching the initial data for the required page (using the same redux store as the front-end) and render the initial HTML document. Is important to notice the 1-on-1 mapping between the [client](https://github.com/impronunciable/hackdash-front/blob/master/src/components/App.js#L13) and the server [routes](https://github.com/impronunciable/hackdash-front/blob/master/server.js#L39).\n\n**Identify each page first render data**\n\nThis may be the hardest part of this technique. There should be one entry point for each page. This doesn’t mean that you can do only one request for a page, you only need to identify when the first render data is loaded and dispatch a _SERVER_READY _action. This will allow the middleware to know when to render your app. The way I prevent the first data to be fetched again on the client is just with [a boolean](https://github.com/impronunciable/hackdash-front/blob/master/src/actions.js#L7) indicating if the app was already mounted once.\n\n**More to come**\n\nAs I said, this is just a WIP. This is the first of a serie of follow-ups on the development of the app. You can follow me on twitter as [@impronunciable](https://x.com/impronunciable).\n\n ",
"date_published": "2016-05-10T01:26:06.000Z",
"date_modified": "2016-05-10T01:26:06.000Z",
"language": "en",
"tags": [
"HackDash",
"node.js",
"opennews"
],
"authors": [
{
"name": "Dan Zajdband",
"url": "https://zajdband.com"
}
]
},
{
"id": "https://zajdband.com/exploring-new-techniques-building-composable-widgets-for-the-web/",
"url": "https://zajdband.com/exploring-new-techniques-building-composable-widgets-for-the-web/",
"title": "Exploring new techniques on building composable widgets for the web",
"summary": "During my first days at the Coral Project I experimented with a feature intimately related with the collaborative nature of the Cral initiative. The main idea is to build a tool to create embeddable widgets to embed into media sites giving more insights to the users about their contributions as well as other readers.",
"content_text": "During my first days at the [Coral Project](https://coralproject.net) I experimented with a feature intimately related with the collaborative nature of the Cral initiative. The main idea is to build a tool to create embeddable widgets to embed into media sites giving more insights to the users about their contributions as well as other readers.\n\nBecause we want publishers to make their online identity stronger, we don't want the widgets to look like other websites. For that reason, the focus was into mimic our components inside the website's characteristic aesthetic. Having this as a rule I formulated a series of goals for this component series:\n\n * Mimic with the host website\n * Make the loading of the widgets non-blocking for the rest of the host website\n * Allow to do server-side rendering on the components, reducing the amount of requests needed from the client\n * The downloaded script should be really small\n * Allow the composition of widgets\n * Offer pre-styled components for sites that want that kind of widget\n\nTo accomplish the mimicking of the widget style and having the book [Third-Party JavaScript](https://thirdpartyjs.com/) as my main inspiration y found 2 ways to tackle the requirement: The first one is to serve the widget on an HTML document situated in our site, insert an iframe on the host website and using heuristics, retrieve the styles from the host site and apply the rules into the iframe. The second option is simply inserting the widget code intro the host website, automatically obtaining the styles from the context. The latter was my to-go choice.\n\nThe main problem with this approach is that **the styles from the host website can break the widget**. The recommendation for this scenario used to be a concept that was kind of prohibited in the Front End world some years ago but now is back. The answer is just to use **inline styles. **I found out that the most used framework nowadays (React) use a technique to compose styles that relies also on inline styles, being perfect for this use case. React also solves server-side rendering and composing widgets as JSX tags, matching two other goals for the widgets.\n\nIt seemed a solved problem, except for a big problem. React's download size is 36kb (gzipped + minified), which is a lot for an embed (at least for me). Welcome [Preact](https://developit.github.io/preact/), a framework with a React compatible API but in 3kb. Preact, despite it's small size, allows us to do virtually everything React does, even [server-side rendering](https://github.com/developit/preact-render-to-string).\n\nOnce I've got the widgets working I found out that the difference between the iframe and the \\`in-site\\` script was only the way they were wrapped. So by writing different wrappers we can offer both the iframe and the injected script experience to the websites. Having both versions working it's easy to see how the iFrame isolation harms the User Experience\n\n[
\n\n \n\nPor qué digo que **hoy te amo ya y ya es mañana**? Porque si bien todos los hipsters estamos llenando Github con Arrow Functions, async/await, HTML y CSS adentro del JS, tipado estático, promesas sobre el bidet y clases, todas estas construcciones son **elecciones** que podemos hacer en el ámbito web. **La era del transpilador es también la era de la modularización**. Si hacemos las cosas bien, y creo que estamos yendo para ese lado, no te tiene que importar demasiado que tu vecino use typescript, (p)react, jQuery mobile, Sencha Touch o simple Vanilla JS. Lo que importa no es tu capacidad de masturbación mental frente a nuevas tecnologías, sino la **experiencia de usuario**. Si tu app carga rápido y funciona bien tus amiguitos van a quererte y vas a ser exitoso/a en el arte del amor.\n\nEntonces para cerrar y dejarte en paz con las 20 pestañas de posts motivacionales de Medium te pido que no pienses si está bien o mal el uso de nuevas construcciones en un lenguaje, sino en como podemos convivir en este rincón del multiverso y preocuparnos por cosas importantes como el homenaje a [Diego Milito](https://www.youtube.com/watch?v=2paikH7sGeQ).\n\n ",
"date_published": "2016-11-29T17:40:19.000Z",
"date_modified": "2016-11-29T17:40:19.000Z",
"language": "es",
"tags": [
"JavaScript"
],
"authors": [
{
"name": "Dan Zajdband",
"url": "https://zajdband.com"
}
]
},
{
"id": "https://zajdband.com/screencast-in-spanish-introduccion-a-preact-con-webpack-y-babel/",
"url": "https://zajdband.com/screencast-in-spanish-introduccion-a-preact-con-webpack-y-babel/",
"title": "Screencast: Introduction to Preact with webpack and babel",
"summary": "In this video I show how to setup a Preact project using webpack and babel, explaining what's going on on each step.",
"content_text": "",
"date_published": "2016-07-01T04:22:28.000Z",
"date_modified": "2016-07-01T04:22:28.000Z",
"language": "en",
"tags": [
"webpack",
"babel"
],
"authors": [
{
"name": "Dan Zajdband",
"url": "https://zajdband.com"
}
]
},
{
"id": "https://zajdband.com/universal-rendering-with-preact/",
"url": "https://zajdband.com/universal-rendering-with-preact/",
"title": "Universal rendering with preact",
"summary": "In this article I explain a technique and conventions to follow in order to achieve Universal rendering (the ability to render an app both client and server side) using preact, node and redux.",
"content_text": "As [@rauchg](https://x.com/rauchg) stated, [server renderer pages are not optional](https://rauchg.com/2014/7-principles-of-rich-web-applications/#server-rendered-pages-are-not-optional). On my journey redoing the [HackDash](https://hackdash.org) front-end I’m trying to apply best practices on this software piece, so implementing Universal rendering was one of the first challenges.\n\nIn this article I explain a technique and conventions to follow in order to achieve Universal rendering (the ability to render an app both client and server side) using [preact](https://preactjs.com/), node and [redux](https://redux.js.org). This is not the only way to do it but it can help you understand some concepts behind this technique. You can see a demo of the Work in Progress using [now](https://zeit.co/now) for the deployment [here](https://hackdash-front-pgalvabhlc.now.sh), the code is [Open-Source](https://github.com/impronunciable/hackdash-front).\n\n**TL;DR**\n\nAn easy way to develop this kind of single-page apps with universal rendering is to break your app in pages (in my case each page refer [1-on-1 with a route](https://github.com/impronunciable/hackdash-front/blob/master/src/components/App.js#L13)) and provide an initial fetch redux action for each page. Then, on the server, [provide a middleware](https://github.com/impronunciable/hackdash-front/blob/master/server.js#L25) to fetch that data and when you get the redux action that indicates the data is loaded, [render the page](https://github.com/impronunciable/hackdash-front/blob/master/template.js) along with a JSON representation of the initial state of the app.\n\n**Transpile your server-side code (too)**\n\nBecause we want to render our client-side preact app on the server, importing the client code into the server, we need to transpile our node code too. Webpack allows to specify a [node target](https://github.com/impronunciable/hackdash-front/blob/master/webpack.config.back.js) that deals for this specific environment while helping with, for example, the jsx components.\n\n**Avoid the usage of browser specific variables**\n\nUsing browser-only variables like _window_ and _document_ will break your server builds. If you must use them you can access to [global polyfills](https://github.com/Raynos/global) or declare them as external on your webpack configuration.\n\n**Share as much code as you can**\n\nThe only difference between the code executed in the server and the client is a [minimal express app](https://github.com/impronunciable/hackdash-front/blob/master/server.js). This code is in charge of fetching the initial data for the required page (using the same redux store as the front-end) and render the initial HTML document. Is important to notice the 1-on-1 mapping between the [client](https://github.com/impronunciable/hackdash-front/blob/master/src/components/App.js#L13) and the server [routes](https://github.com/impronunciable/hackdash-front/blob/master/server.js#L39).\n\n**Identify each page first render data**\n\nThis may be the hardest part of this technique. There should be one entry point for each page. This doesn’t mean that you can do only one request for a page, you only need to identify when the first render data is loaded and dispatch a _SERVER_READY _action. This will allow the middleware to know when to render your app. The way I prevent the first data to be fetched again on the client is just with [a boolean](https://github.com/impronunciable/hackdash-front/blob/master/src/actions.js#L7) indicating if the app was already mounted once.\n\n**More to come**\n\nAs I said, this is just a WIP. This is the first of a serie of follow-ups on the development of the app. You can follow me on twitter as [@impronunciable](https://x.com/impronunciable).\n\n ",
"date_published": "2016-05-10T01:26:06.000Z",
"date_modified": "2016-05-10T01:26:06.000Z",
"language": "en",
"tags": [
"HackDash",
"node.js",
"opennews"
],
"authors": [
{
"name": "Dan Zajdband",
"url": "https://zajdband.com"
}
]
},
{
"id": "https://zajdband.com/exploring-new-techniques-building-composable-widgets-for-the-web/",
"url": "https://zajdband.com/exploring-new-techniques-building-composable-widgets-for-the-web/",
"title": "Exploring new techniques on building composable widgets for the web",
"summary": "During my first days at the Coral Project I experimented with a feature intimately related with the collaborative nature of the Cral initiative. The main idea is to build a tool to create embeddable widgets to embed into media sites giving more insights to the users about their contributions as well as other readers.",
"content_text": "During my first days at the [Coral Project](https://coralproject.net) I experimented with a feature intimately related with the collaborative nature of the Cral initiative. The main idea is to build a tool to create embeddable widgets to embed into media sites giving more insights to the users about their contributions as well as other readers.\n\nBecause we want publishers to make their online identity stronger, we don't want the widgets to look like other websites. For that reason, the focus was into mimic our components inside the website's characteristic aesthetic. Having this as a rule I formulated a series of goals for this component series:\n\n * Mimic with the host website\n * Make the loading of the widgets non-blocking for the rest of the host website\n * Allow to do server-side rendering on the components, reducing the amount of requests needed from the client\n * The downloaded script should be really small\n * Allow the composition of widgets\n * Offer pre-styled components for sites that want that kind of widget\n\nTo accomplish the mimicking of the widget style and having the book [Third-Party JavaScript](https://thirdpartyjs.com/) as my main inspiration y found 2 ways to tackle the requirement: The first one is to serve the widget on an HTML document situated in our site, insert an iframe on the host website and using heuristics, retrieve the styles from the host site and apply the rules into the iframe. The second option is simply inserting the widget code intro the host website, automatically obtaining the styles from the context. The latter was my to-go choice.\n\nThe main problem with this approach is that **the styles from the host website can break the widget**. The recommendation for this scenario used to be a concept that was kind of prohibited in the Front End world some years ago but now is back. The answer is just to use **inline styles. **I found out that the most used framework nowadays (React) use a technique to compose styles that relies also on inline styles, being perfect for this use case. React also solves server-side rendering and composing widgets as JSX tags, matching two other goals for the widgets.\n\nIt seemed a solved problem, except for a big problem. React's download size is 36kb (gzipped + minified), which is a lot for an embed (at least for me). Welcome [Preact](https://developit.github.io/preact/), a framework with a React compatible API but in 3kb. Preact, despite it's small size, allows us to do virtually everything React does, even [server-side rendering](https://github.com/developit/preact-render-to-string).\n\nOnce I've got the widgets working I found out that the difference between the iframe and the \\`in-site\\` script was only the way they were wrapped. So by writing different wrappers we can offer both the iframe and the injected script experience to the websites. Having both versions working it's easy to see how the iFrame isolation harms the User Experience\n\n[ ](/wp-content/uploads/2016/03/iframe.gif)\n \n\nI'll continue working with this tool and blogging improvements. I'd love to know your experiences related to Third-Party applications in the web. You can find me on Twitter as [@impronunciable](https://x.com/impronunciable).\n\n
\n Thanks @sandhya__k for reviewing this article.\n
", "date_published": "2016-03-21T17:45:53.000Z", "date_modified": "2016-03-21T17:45:53.000Z", "language": "en", "tags": [ "Coral", "node.js", "opennews", "prototyping" ], "authors": [ { "name": "Dan Zajdband", "url": "https://zajdband.com" } ] }, { "id": "https://zajdband.com/hackdash-v2-call-for-devs-and-desginers/", "url": "https://zajdband.com/hackdash-v2-call-for-devs-and-desginers/", "title": "HackDash v2: Call for devs and desginers", "summary": "I started HackDash about 3 years ago with the hope of improving the way Hackathon projects are followed, presented and shared. was set up as an open source project from the beginning allowing us to get amazing people contributing.", "content_text": "I started [HackDash](https://hackdash.org) about [3 years ago](/hackdash-putting-ideas-together-solving-problems/) with the hope of improving the way Hackathon projects are followed, presented and shared. [HackDash](https://hackdash.org) was set up as an [open source](github.com/impronunciable/hackdash) project from the beginning allowing us to get amazing people contributing.\n\nLike most Software, HackDash started as a small project and grew at different rates. We learned a lot about the problem we are attacking and have a lot of new ideas and I feel at this point is hard to make them possible with our current design and codebase.\n\nMore than 1100 dashboards and 3800 projects validate that HackDash is solving a problem many Events have about showcasing and persisting projects. It is time to use the gained expertise and build a new HackDash allowing more interesting ways to interact in Hackathons and other kind of events. My proposal is to rebuild [HackDash](https://hackdash.org) getting contributors at day 0.\n\n**Contributing**\n\nI created a [Slack Team](https://hackdash-slack.herokuapp.com/) that I invite you to [join](https://hackdash-slack.herokuapp.com/) in order to discuss everything about the development and key decisions in the making of this new version.\n\nI also created the first 2 GitHub repos for the [API](https://github.com/impronunciable/hackdash-api) and the [Web Client](https://github.com/impronunciable/hackdash-web-client). The only decision made, and an important one is the basic development stack. We’ll use Go for the main backend API, React + Redux for the Web client and Postgres as the main database. The rest is up to discussion.\n\nSee you in [Slack](https://hackdash-slack.herokuapp.com/)!", "date_published": "2015-12-16T21:59:58.000Z", "date_modified": "2015-12-16T21:59:58.000Z", "language": "en", "tags": [ "HackDash" ], "authors": [ { "name": "Dan Zajdband", "url": "https://zajdband.com" } ] }, { "id": "https://zajdband.com/installing-hackdash/", "url": "https://zajdband.com/installing-hackdash/", "title": "Installing HackDash", "summary": "In a previous post I explained the project history, goals and involved people. Shortly saying HackDash is a dashboard where you can put your project ideas. It was specially designed for Hackatons but it was used for other purposes with really good results.", "content_text": "In a [previous post](/hackdash) I explained the project \nhistory, goals and involved people. Shortly saying HackDash is a dashboard where \nyou can put your project ideas. It was specially designed for Hackatons but it \nwas used for other purposes with really good results.\n\nSince I received lots of mails asking how to install it in different servers \nI decided to make this post explaining how can you install it for yourself.\n\nFurthermore I will explain the steps I usually do in order to install a \nHackDash instance using Heroku and MongoLab (you can use it for free for small \nprojects, the free version for both services can hold a HackDash instance with an interesting amount of users and projects).\n\n \n\n## Basic Install\n\n### Installation Prequisites\n\nHackDash is based on top of 2 open-source projects:\n\n * [Node.js](https://nodejs.org/): You can install it using the install button on the home page. If you are using Linux you can build the sources or use your favorite package manager.\n * [MongoDB](https://www.mongodb.org/downloads): the downloads page will help you with the installation process.\n\nThat’s it. If you can run node.js and MongoDB, you can then install a HackDash instance.\n\n### Download the project and install the dependencies\n\nFirst, download the project source. You can Download it from [this link](https://github.com/danzajdband/hackdash/archive/master.zip) or clone the repo:\n\n
$ git clone git@github.com:danzajdband/hackdash.git\n\n\nThen, inside the project folder, install the dependencies\n\n
$ npm install\n\n\n### Project configuration\n\nWhen this process finish you’ll need to config the app. The easiest way is to \ncopy the file called `config.json.sample` to `config.json` and \n`keys.json.sample` to `keys.json`.\n\nOpen your `config.json` file and set yur config settings.\n\nThe `keys.json` file allows different auth providers. You need to fill at least \none of those to make your users LogIn. I want to provide email + password login \nfor the future but now is not available at the moment.\n\nAt the moment we allow 4 different auth providers: Twitter, Facebook, Meetup and \nGithub. Choose the services you want and fill the file with your credentials.\n\nFor example to get Twitter credentials you need to go to \n[Twitter dev](https://dev.twitter.com/) and create a new application.\n\nKeep in mind that the callback url format is /auth/{provider}/callback while you generate the provider \ncredentials.\n\n### Run the app\n\nTo run the app you just need to start MongoDB (the fork option is optional, it \nwill run MongoDB in background) and init the node server.\n\n
$ mongod --fork your/log/file\n$ node server.js\n\n\nThen open your browser using the address you provide and will have a fully-working HackDash instance.\n\n### Deploy options\n\nThis apply to any node.js project but I left it as a good remainder (don’t \nforget the HackDash is not more than a [ExpressJS](https://expressjs.com) app) some deployment good advices.\n\n * If you are going to deploy it in a production environment, start the script with the production flag. \n $ NODE_ENV=production node server.js \n \n * It is recommended to use a node script reloader. I recommend \n [Up](https://github.com/LearnBoost/up) but is up to you. \n [Forever](https://github.com/nodejitsu/forever) is also widely used. \n \n ### Make yourself the Dashboard admin\n \n If you point your browser to yourdomain.com/install while logged in you’ll \n became the admin of the Dashboard. The /install route will redirect to the \n previous page you visited if the admin was selected before.\n \n ## Installation using Heroku and MongoLab\n \n I choose these services because I made some successful installations on this \n environment, and it’s pretty easy to work with.\n \n ### Prequisites\n \n * Create a [Heroku](https://heroku.com) account and install the CLI.\n \n ### Download and Configure\n \n The steps (Download and Configure) are the same as the Basic installation, you’ll want to \n check it out above. For this type of installation I’ll ask you to clone the \n project instead of downloading the source tarball (It will be easy to deploy then). Once you finish configuring your project instance, this are \n the next steps\n \n ### Create a Procfile\n \n Create a file in the root project folder called `Procfile` and write inside\n \n
web: node server.js\n\n \n ### Create the Heroku application\n \n To create a Heroku app, follow this steps\n \n
$ heroku login\n$ heroku create\n\n \n ### Add the MongoLab add-on to the app\n \n I choose the starter package that is free, you can select [https://addons.heroku.com/mongolab](the%20one%20you%20need).\n \n
$ heroku addons:add mongolab:starter\n\n \n Then add your MongoLab URI to the config file, the url will override other db \n config. To get your MongoLab URI perform this command in your terminal\n \n
$ heroku config | grep MONGOLAB_URI\n\n \n ### Commit the changes, and deploy\n \n You need to commit the changes you made to push the files to heroku.\n \n
$ git add config.json Procfile\n$ git commit -m \"Heroku deploy config\"\n$ git push heroku master\n\n \n ### Scale the app\n \n If you want to use more than one process it’s cool, you just need to change the \n 1 in the following command\n \n
$ heroku ps:scale web=1\n\n \n ### Logs\n \n If you want to see the logs you can do `$ heroku logs`\n \n ## Final notes\n \n This is the process I usually do for both kind of deployments. If you have any \n questions, please [contact me](mailto:dan.zajdband@gmail.com). The project is under \n development, I’ll be glad to add more people to the list of [awesome \n contributors](https://github.com/danzajdband/hackdash/contributors). [Git \n tips](https://www.gittip.com/dzajdband/) are also welcome.", "date_published": "2013-04-19T01:47:20.000Z", "date_modified": "2013-04-19T01:47:20.000Z", "language": "en", "tags": [ "HackDash" ], "authors": [ { "name": "Dan Zajdband", "url": "https://zajdband.com" } ] }, { "id": "https://zajdband.com/hackdash-putting-ideas-together-solving-problems/", "url": "https://zajdband.com/hackdash-putting-ideas-together-solving-problems/", "title": "HackDash: Putting Ideas Together, Solving Problems", "summary": "We live in a perfect world for open source and free software. Social networks (like twitter or GitHub at some point) connect us and offer a perfect place to work together on fun and useful projects. A cool thing about this is that you don't have to be a Programmer in order to be a key part of a software project.", "content_text": "We live in a perfect world for open source and free software. Social networks (like twitter or GitHub at some point) connect us and offer a perfect place to work together on fun and useful projects. A cool thing about this is that you don't have to be a Programmer in order to be a key part of a software project.\n\nOne big example is [HacksHackersBA](https://hhba.info) where hackers and journalists share ideas.\n\nThat was the context of the [HackDash](https://github.com/danzajdband/hackdash) born. [@blejman](https://x.com/blejman) had an idea about a Dashboard for HacksHackersBA hackatons, and I was interested in implement that idea. If the open-source community teached me something is: If you want to show that something is useful, just do it.\n\nSo we [started building the app](https://github.com/hhba/hackdash/commit/6de06c5b37f6ed44b9849859e6735d6c456d0c8e) hoping we can get to the [Buenos Aires media party](https://mediaparty.hhba.info) with something that doesn't suck.\n\nThe Media Party Hackaton day came followed by a grateful surprise. Not only the people liked the [HackDash implementation](https://hackdash.hhba.info) but a couple of coders added the improvement of the HackDash as a Hackaton project.\n\nAfter the Media Party I realized that this small app is filling a real need. The Dashboard is been used now in several ways. For example by [Node.js Argentina meetup](https://https://dashboard-ar.jit.su/), [HacksHackersBA](https://hackdash.hhba.info), [La Nación DataFest](https://hackdash.datafest.org.ar) and [HackasHackersCL](https://ideas.hackshackers.cl/) (using it as a WordPress theme).\n\nNow we are working on our free time for a new version of the web app and looking for more contributors. Feel free to [contact me](mailto:dan.zajdband@gmail.com).", "date_published": "2012-11-03T01:44:42.000Z", "date_modified": "2012-11-03T01:44:42.000Z", "language": "en", "tags": [ "HackDash" ], "authors": [ { "name": "Dan Zajdband", "url": "https://zajdband.com" } ] }, { "id": "https://zajdband.com/express-and-components-presentation-at-node-js-argentina-meetup/", "url": "https://zajdband.com/express-and-components-presentation-at-node-js-argentina-meetup/", "title": "Express (and Components) Presentation at node.js Argentina Meetup", "summary": "I had the pleasure to be invited to talk at the 2nd node.js Argentina meetup about ExpressJS. Because most of the attendees are starting with node the main idea was to introduce some important aspects about this llibrary and the motivations about express.", "content_text": "I had the pleasure to be invited to talk at the 2nd [node.js Argentina meetup](https://www.meetup.com/NodeJS-Argentina/) about [ExpressJS](https://expressjs.com). Because most of the attendees are starting with node the main idea was to introduce some important aspects about this llibrary and the motivations about express.\n\nAfter a review of the most popular node.js web framework, I introduced [Components](https://github.com/component/component), a brand new package manager for client-side components.\n\n[Here](https://speakerdeck.com/danzajdband/introduccion-a-express-meetup-node-dot-js-argentina) are the slides for the presentation\n\n", "date_published": "2012-11-02T01:39:50.000Z", "date_modified": "2012-11-02T01:39:50.000Z", "language": "en", "tags": [ "node.js", "talks" ], "authors": [ { "name": "Dan Zajdband", "url": "https://zajdband.com" } ] }, { "id": "https://zajdband.com/tuiter-0-1-1/", "url": "https://zajdband.com/tuiter-0-1-1/", "title": "Tuiter 0.1.1", "summary": "I've been working on Tuiter. This new release count with two major features: **Automatic Reconnection** and **Gzip compression**.", "content_text": "I’ve been working on Tuiter. This new release count with two major features: **Automatic Reconnection** and **Gzip compression**.\n\n#### Automatic Reconnection\n\nStreaming API connections are incredible powerful and it’s very common to keep those connections open all the time. The thing is Twitter closes valid connections very often because of:\n\n * Duplicate clients logins (earlier connections terminated)\n * Hosebird server restarts (code deploys)\n * Lagging connection terminated (client too slow, or insufficient bandwidth)\n * General Twitter network maintenance (Load balancer restarts, network reconfigurations, other very very rare events)\n\nFollowing the Twitter Team recommendations I made this simple _Automatic reconnector_ for the library.\n\n#### Gzip compression\n\nTwitter give us the oportunity of reduce the streams to 1/5 size using Gzip-formatted data via `Accept-encoding` header. Using the header and uncompressing with the help of the node.js core module ‘zlib’ now all API calls are performed with this format.\n\n#### State of the art\n\nFor the next release I want to improve the performance of the library and the parameters pre-processing. Don't forget to Fork me on gitHub!", "date_published": "2012-07-19T02:05:46.000Z", "date_modified": "2012-07-19T02:05:46.000Z", "language": "en", "tags": [ "node.js", "tuiter" ], "authors": [ { "name": "Dan Zajdband", "url": "https://zajdband.com" } ] }, { "id": "https://zajdband.com/tuiter-0-1-0/", "url": "https://zajdband.com/tuiter-0-1-0/", "title": "Tuiter 0.1.0", "summary": "I’ve been working on this node.js twitter library called Tuiter (That’s how Twitter sounds in spanish). I think it’s mature enough to release the first stable version of the module.", "content_text": "I’ve been working on this node.js twitter library called Tuiter (That’s how Twitter sounds in spanish). I think it’s mature enough to release the first stable version of the module.\n\n#### Features\n\nFor usage and installation steps you can go to the README. This are the most important features:\n\n * All API methods available (for Search, REST and Streaming APIs)\n * Params preprocessing: Locations as {lat: num,long:num } arrays, allow array params\n * API HTTP Error handling\n * Paging for REST API\n * Custom results for Search API\n\n#### Demo\n\nFew weeks ago I deployed a demo on Heroku using Tuiter, Google Maps, Socket.IO and ExpressJS. This is just an example of the power of the twitter Streaming API. Can’t wait to see your own demos/apps!\n\n#### State of the art\n\nI’m working on automatic reconnection for the Streaming API calls for a next version. Another feature I want to add is the possibility to filter by location names (like “Buenos Aires” or “Asia” instead of bounding boxes). Stay tuned.", "date_published": "2012-07-10T02:01:58.000Z", "date_modified": "2012-07-10T02:01:58.000Z", "language": "en", "tags": [ "node.js", "tuiter" ], "authors": [ { "name": "Dan Zajdband", "url": "https://zajdband.com" } ] } ] }